用Python將音頻內容轉換為文本格式
當對一個或多個人的談話進行記錄時,采用一種高度準確和自動化的方式將口語提取為文本非常有用。轉換成文字后,便可以將其用于進一步分析或用作其他功能。
在本教程中,我們將使用稱為AssemblyAI(https://www.assemblyai.com/)的高精度語音轉文本Web API從MP3錄音中提取文本(也支持許多其他格式)。
在本教程中,音頻文件示例下載地址請掃描本文下方二維碼添加Python小助手獲取,下面是音頻輸出如下所示的高精度文本轉錄內容:
- An object relational mapper is a code library that automates the transfer of
- data stored in relational, databases into objects that are more commonly used
- in application code or EMS are useful because they provide a high level
- abstraction upon a relational database that allows developers to write Python
- code instead of sequel to create read update and delete, data and schemas in
- their database. Developers can use the programming language. They are
- comfortable with to work with a database instead of writing SQL...
教程要求
在本教程中,我們將使用以下依賴項,稍后將安裝它們。請確保您的環(huán)境中還安裝了Python 3,最好安裝3.6或更高版本:
我們將使用以下依賴關系來完成本教程:
- requests 2.24.0 來向AssemblyAI語音文本API發(fā)出HTTP請求
- 一個 AssemblyAI 帳戶,您可以在此處(https://app.assemblyai.com/login/)注冊免費的API訪問密鑰
本文所有代碼下載地址請掃描本文下方二維碼添加Python小助手獲取。
搭建開發(fā)環(huán)境
轉到保存Python虛擬環(huán)境的目錄。我將我的目錄保存在用戶主目錄下的venvs子目錄中。使用以下命令為此項目創(chuàng)建一個新的virtualenv。
- python3 -m venv ~/venvs/pytranscribe
用 shell 命令激活 virtualenv:
- source ~/venvs/pytranscribe/bin/activate
執(zhí)行上述命令后,命令提示符將發(fā)生更改,因此virtualenv的名稱將以原始命令提示符格式開頭,如果您的提示符只是$,則其外觀如下所示:
- (pytranscribe) $
請記住,您必須在每個 virtualenv 中使用依賴項的新終端窗口中激活您的 virtualenv 。
現(xiàn)在,我們可以將請求包安裝到已激活但為空的 virtualenv 中。
- pip install requests==2.24.0
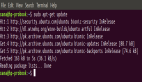
查找類似于以下內容的輸出,以確認從PyPI正確安裝了相應的軟件包。
- (pytranscribe) $ pip install requests==2.24.0
- Collecting requests==2.24.0
- Using cached https://files.pythonhosted.org/packages/45/1e/0c169c6a5381e241ba7404532c16a21d86ab872c9bed8bdcd4c423954103/requests-2.24.0-py2.py3-none-any.whl
- Collecting certifi>=2017.4.17 (from requests==2.24.0)
- Using cached https://files.pythonhosted.org/packages/5e/c4/6c4fe722df5343c33226f0b4e0bb042e4dc13483228b4718baf286f86d87/certifi-2020.6.20-py2.py3-none-any.whl
- Collecting urllib3!=1.25.0,!=1.25.1,<1.26,>=1.21.1 (from requests==2.24.0)
- Using cached https://files.pythonhosted.org/packages/9f/f0/a391d1463ebb1b233795cabfc0ef38d3db4442339de68f847026199e69d7/urllib3-1.25.10-py2.py3-none-any.whl
- Collecting chardet<4,>=3.0.2 (from requests==2.24.0)
- Using cached https://files.pythonhosted.org/packages/bc/a9/01ffebfb562e4274b6487b4bb1ddec7ca55ec7510b22e4c51f14098443b8/chardet-3.0.4-py2.py3-none-any.whl
- Collecting idna<3,>=2.5 (from requests==2.24.0)
- Using cached https://files.pythonhosted.org/packages/a2/38/928ddce2273eaa564f6f50de919327bf3a00f091b5baba8dfa9460f3a8a8/idna-2.10-py2.py3-none-any.whl
- Installing collected packages: certifi, urllib3, chardet, idna, requests
- Successfully installed certifi-2020.6.20 chardet-3.0.4 idna-2.10 requests-2.24.0 urllib3-1.25.10
我們已經安裝了所有必需的依賴項,因此我們可以開始對應用程序進行編碼。
上傳、啟動和轉錄音頻
我們已完成開始構建應用程序所需的一切,該應用程序會將音頻轉換為文本。我們將在三個文件中構建此應用程序:
1、upload_audio_file.py:將您的音頻文件上傳到AssemblyAI服務上的安全位置,以便可以進行處理。如果您的音頻文件已經可以通過公共URL訪問,則無需執(zhí)行此步驟,只需按照此快速入門(https://docs.assemblyai.com/overview/getting-started)
2、initial_transcription.py:告訴API要轉錄并立即啟動的文件
3、get_transcription.py:如果仍在處理轉錄,則顯示轉錄狀態(tài),或者在處理完成后顯示轉錄結果
創(chuàng)建一個名為pytranscribe的新目錄,以在我們編寫文件時存儲這些文件。然后轉到新的項目目錄。
- mkdir pytranscibe
- cd pytranscribe
我們還需要將 AssemblyAI API 密鑰導出為環(huán)境變量。注冊 AssemblyAI 帳戶并登錄 AssemblyAI 儀表板,然后復制“您的API token”,如以下屏幕截圖所示:
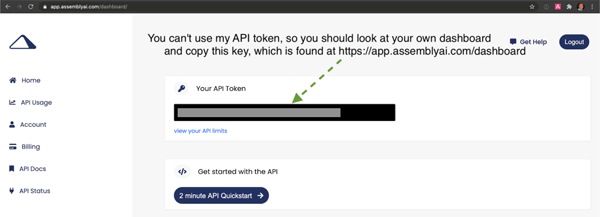
- export ASSEMBLYAI_KEY=your-api-key-here
請注意,必須每個命令行窗口中使用 export 命令以保證此密鑰可訪問。如果您沒有在運行腳本的環(huán)境中將標記導出為 ASSEMBLYAI_KEY,則我們正在編寫的腳本將無法訪問API。
現(xiàn)在我們已經創(chuàng)建了項目目錄并將API密鑰設置為環(huán)境變量,讓我們繼續(xù)編寫第一個文件的代碼,該文件會將音頻文件上傳到AssemblyAI服務。
上傳音頻文件并進行轉錄
創(chuàng)建一個名為upload_audio_file.py的新文件,并將以下代碼放入其中:
- import argparse
- import os
- import requests
- API_URL = "https://api.assemblyai.com/v2/"
- def upload_file_to_api(filename):
- """Checks for a valid file and then uploads it to AssemblyAI
- so it can be saved to a secure URL that only that service can access.
- When the upload is complete we can then initiate the transcription
- API call.
- Returns the API JSON if successful, or None if file does not exist.
- """
- if not os.path.exists(filename):
- return None
- def read_file(filename, chunk_size=5242880):
- with open(filename, 'rb') as _file:
- while True:
- data = _file.read(chunk_size)
- if not data:
- break
- yield data
- headers = {'authorization': os.getenv("ASSEMBLYAI_KEY")}
- response = requests.post("".join([API_URL, "upload"]), headersheaders=headers,
- data=read_file(filename))
- return response.json()
上面的代碼導入了argparse,os和request軟件包,以便我們可以在此腳本中使用它們。API_URL是一個常量,具有AssemblyAI服務的基本URL。我們使用單個參數(shù)定義upload_file_to_api函數(shù),filename應該是一個字符串,其中包含文件及其文件名的絕對路徑。
在函數(shù)中,我們檢查文件是否存在,然后使用Request的分塊傳輸編碼將大文件流式傳輸?shù)紸ssemblyAI API。
os模塊的getenv函數(shù)讀取使用帶有getenv的export命令在命令行上設置的API。確保在運行此腳本的終端中使用該導出命令,否則ASSEMBLYAI_KEY值將為空白。如有疑問,請使用echo $ ASSEMBLY_AI查看該值是否與您的API密鑰匹配。
要使用upload_file_to_api函數(shù),請將以下代碼行添加到upload_audio_file.py文件中,以便我們可以正確地將此代碼作為使用python命令調用的腳本執(zhí)行:
- if __name__ == "__main__":
- parser = argparse.ArgumentParser()
- parser.add_argument("filename")
- args = parser.parse_args()
- upload_filename = args.filename
- response_json = upload_file_to_api(upload_filename)
- if not response_json:
- print("file does not exist")
- else:
- print("File uploaded to URL: {}".format(response_json['upload_url']))
上面的代碼創(chuàng)建了一個ArgumentParser對象,它允許應用程序從命令行獲取單個參數(shù)來指定我們要訪問的對象,讀取并上傳到AssmeblyAI服務的文件。
如果文件不存在,腳本將顯示一條消息,提示找不到該文件。在路徑中,我們確實找到了正確的文件,然后使用upload_file_to_api函數(shù)中的代碼上傳了文件。
通過使用python命令在命令行上運行完整的upload_audio_file.py腳本,以執(zhí)行該腳本。將FULL_PATH_TO_FILE替換為您要上傳的文件的絕對路徑,例如/Users/matt/devel/audio.mp3。
- python upload_audio_file.py FULL_PATH_TO_FILE
假設在您指定的位置找到文件,當腳本完成文件的上傳后,它將打印一條帶有唯一URL的消息:
- File uploaded to URL: https://cdn.assemblyai.com/upload/463ce27f-0922-4ea9-9ce4-3353d84b5638
該URL不是公開的,只能由AssemblyAI服務使用,因此除您及其轉錄的API外,其他任何人都無法訪問您的文件及其內容。
重要的部分是URL的最后一部分,在此示例中為463ce27f-0922-4ea9-9ce4-3353d84b5638。保存該唯一標識符,因為我們需要將其傳遞給下一個啟動轉錄服務的腳本。
啟動轉錄
接下來,我們將編寫一些代碼來開始轉錄。創(chuàng)建一個名為initial_transcription.py的新文件。將以下代碼添加到新文件中。
- import argparse
- import os
- import requests
- API_URL = "https://api.assemblyai.com/v2/"
- CDN_URL = "https://cdn.assemblyai.com/"
- def initiate_transcription(file_id):
- """Sends a request to the API to transcribe a specific
- file that was previously uploaded to the API. This will
- not immediately return the transcription because it takes
- a moment for the service to analyze and perform the
- transcription, so there is a different function to retrieve
- the results.
- """
- endpoint = "".join([API_URL, "transcript"])
- json = {"audio_url": "".join([CDN_URL, "upload/{}".format(file_id)])}
- headers = {
- "authorization": os.getenv("ASSEMBLYAI_KEY"),
- "content-type": "application/json"
- }
- response = requests.post(endpoint, jsonjson=json, headersheaders=headers)
- return response.json()
我們具有與先前腳本相同的導入,并添加了一個新常量CDN_URL,該常量與AssemblyAI存儲上傳的音頻文件的單獨URL匹配。
initiate_transcription函數(shù)本質上只是向AssemblyAI API設置了一個HTTP請求,以傳入的特定URL對音頻文件啟動轉錄過程。這就是為什么file_id傳遞很重要的原因:完成音頻文件的URL 我們告訴AssemblyAI進行檢索。
通過附加此代碼來完成文件,以便可以從命令行輕松地使用參數(shù)調用它。
- if __name__ == "__main__":
- parser = argparse.ArgumentParser()
- parser.add_argument("file_id")
- args = parser.parse_args()
- file_id = args.file_id
- response_json = initiate_transcription(file_id)
- print(response_json)
通過在initiate_transcription文件上運行python命令來啟動腳本,并傳入您在上一步中保存的唯一文件標識符。
- # the FILE_IDENTIFIER is returned in the previous step and will
- # look something like this: 463ce27f-0922-4ea9-9ce4-3353d84b5638
- python initiate_transcription.py FILE_IDENTIFIER
API將發(fā)回該腳本打印到命令行的JSON響應。
- {'audio_end_at': None, 'acoustic_model': 'assemblyai_default', 'text': None,
- 'audio_url': 'https://cdn.assemblyai.com/upload/463ce27f-0922-4ea9-9ce4-3353d84b5638',
- 'speed_boost': False, 'language_model': 'assemblyai_default', 'redact_pii': False,
- 'confidence': None, 'webhook_status_code': None,
- 'id': 'gkuu2krb1-8c7f-4fe3-bb69-6b14a2cac067', 'status': 'queued', 'boost_param': None,
- 'words': None, 'format_text': True, 'webhook_url': None, 'punctuate': True,
- 'utterances': None, 'audio_duration': None, 'auto_highlights': False,
- 'word_boost': [], 'dual_channel': None, 'audio_start_from': None}
記下JSON響應中id鍵的值。這是我們需要用來檢索轉錄結果的轉錄標識符。在此示例中,它是gkuu2krb1-8c7f-4fe3-bb69-6b14a2cac067。復制轉錄標識符到您自己的響應中,因為在下一步中我們將需要它來檢查轉錄過程何時完成。
檢索轉錄結果
我們已經上傳并開始了轉錄過程,因此,準備就緒后,我們將盡快獲得結果。
返回結果所需的時間取決于文件的大小,因此下一個腳本將向HTTP發(fā)送一個HTTP請求,并報告轉錄狀態(tài),或者在完成后打印輸出。
創(chuàng)建一個名為 get_transcription.py 的第三個Python文件,并將以下代碼放入其中。
- import argparse
- import os
- import requests
- API_URL = "https://api.assemblyai.com/v2/"
- def get_transcription(transcription_id):
- """Requests the transcription from the API and returns the JSON
- response."""
- endpoint = "".join([API_URL, "transcript/{}".format(transcription_id)])
- headers = {"authorization": os.getenv('ASSEMBLYAI_KEY')}
- response = requests.get(endpoint, headersheaders=headers)
- return response.json()
- if __name__ == "__main__":
- parser = argparse.ArgumentParser()
- parser.add_argument("transcription_id")
- args = parser.parse_args()
- transcription_id = args.transcription_id
- response_json = get_transcription(transcription_id)
- if response_json['status'] == "completed":
- for word in response_json['words']:
- print(word['text'], end=" ")
- else:
- print("current status of transcription request: {}".format(
- response_json['status']))
上面的代碼與其他腳本具有相同的 imports 對象。在這個新的get_transcription函數(shù)中,我們只需使用我們的API密鑰和上一步中的轉錄標識符(而不是文件標識符)調用AssemblyAI API。我們檢索JSON響應并將其返回。
在main函數(shù)中,我們處理作為命令行參數(shù)傳入的轉錄標識符,并將其傳遞給get_transcription函數(shù)。如果來自get_transcription函數(shù)的響應JSON包含completed狀態(tài),則我們將打印轉錄結果。否則,請在completed之前打印當前狀態(tài)如queued或processing。
使用命令行和上一節(jié)中的轉錄標識符調用腳本:
- python get_transcription.py TRANSCRIPTION_ID
如果該服務尚未開始處理腳本,則它將返回queued,如下所示:
- current status of transcription request: queued
當服務當前正在處理音頻文件時,它將返回processing:
- current status of transcription request: processing
該過程完成后,我們的腳本將返回轉錄文本,如您在此處看到的那樣:
- An object relational mapper is a code library that automates the transfer of
- data stored in relational, databases into objects that are more commonly used
- in application code or EMS are useful because they provide a high level
- ...(output abbreviated)
就是這樣,我們已經轉錄完成了!
您可能想知道如果精度不適合您的情況該怎么辦。這就是需要用到提高關鍵字或短語的準確性方法(https://docs.assemblyai.com/guides/boosting-accuracy-for-keywords-or-phrases)和選擇與數(shù)據(jù)更匹配的模型方法(https://docs.assemblyai.com/guides/transcribing-with-a-different-acoustic-or-custom-language-model)的地方。您可以使用這兩種方法中的任一種,將記錄的準確性提高到適合您情況的水平。
下一步是什么?
我們剛剛完成了一些腳本,這些腳本調用AssemblyAI API來將帶有語音的錄音轉錄為文本輸出。您可以查閱文檔(https://docs.assemblyai.com/overview/getting-started)來增加一些更高級功能:
- 支持不同的文件格式
- 轉錄雙通道/立體聲錄音
- 獲取揚聲器標簽(揚聲器隔離)