成人免费xxxxx在线视频软件_久久精品久久久_亚洲国产精品久久久_天天色天天色_亚洲人成一区_欧美一级欧美三级在线观看

如何在React Native中實現類Instagram濾鏡效果?

譯文 精選
開發 前端
本文通過分步驟的指南,說明如何在React Native中整合圖片編輯,并實現類Instagram濾鏡的效果。
譯者 | 崔皓

?審校 | 孫淑娟

開篇

本文通過分步驟的指南,說明如何在React Native中整合圖片編輯,并實現類Instagram濾鏡的效果。

在Instagram上,你可以很容易地使用濾鏡功能,并迅速得到想要的結果。濾鏡功能很好地修改照片,讓人們得到想要的效果。一些用戶想要在自定義的React Native中實現類似的濾鏡效果。也就是說將Instagram的濾鏡應用到React Native 程序中。

為了滿足這個要求,本文編寫了一個分步驟的指南,說明如何在React Native中整合圖片編輯,實現類似Instagram濾鏡的功能。

我們的開發人員在對React Native中的各種過濾器庫進行廣泛研究之后,并沒有找到理想的實現效果。于是,他們想出了在React Native中構建圖像濾鏡的特別指南。

就讓我們手捧指南,從這里出發吧!

前提條件

沒有特別的要求,只要確保React Native已經安裝,并保證項目已經創建。

雖然,安裝React Native和設置并非易事,由于本文主題在如何進行圖片編輯,因此不展開說React Native和設置,如果有需要可以訪問??React Native官網??,獲取更多信息。

安裝相關庫

在應用程序中,需要三個主要功能;裁剪、過濾和下載。為了實現這些功能,我們的開發人員已經選擇了三個最好的庫來支持React Native中的濾鏡功能。

1.圖像裁剪

圖像裁剪允許按照尺寸自由調整裁剪圖像。它是移動應用開發不可獲缺的重要組成部分。我們可以通過??Crop Picker Library??來獲得裁剪圖片的功能。該庫還提供了視頻編輯功能。

2.圖像過濾器

我們使用 ??React Native Image Filter Kit?? 來處理應用程序中的圖像過濾。基于該工具包,我們創建了一個特殊的代碼來生成20多個過濾器。

3.圖片下載

為了分享修改后的圖片,人們需要將其下載到手機上。這個功能可以從 ??React Native Cameraroll Library?? 庫中獲得,該庫可以幫助開發者將過濾后的圖片保存在iOS和Android的照片庫中。

核心功能開發指南

一旦上述庫安裝好之后,就可以開始核心功能的開發了。接下來,讓我們進入編碼部分,實現既定的里程碑。

如圖 1 所示,這里列出了文件夾結構,它可以幫助我們理解文件之間的關系以及需要實現的功能。

圖1:代碼文件結構

第1步:調用手機相冊

創建文件夾名為 "ChooseImage"。接下來,添加 "index.jsx "文件。為了從手機圖庫中獲取圖片,在'index.jsx'文件中添加以下代碼。

import React, { useState } from 'react';

import {

Image,

Alert,

SafeAreaView,

StyleSheet,

Text,

TouchableOpacity,

View,

} from 'react-native';

import { launchImageLibrary } from 'react-native-image-picker';

import {

widthPercentageToDP as wp,

heightPercentageToDP as hp,

} from 'react-native-responsive-screen';

import Constants from '../../Constants/Constants';

import Button from '../../Components/Button';

import Loader from '../../Components/Loader';

import ImagePicker from 'react-native-image-crop-picker';


const CreatePost = ({ navigation }) => {


const [thumbnail, setThumbnail] = useState({});

const [loaderVisible, setLoaderVisible] = useState(false);


const onChooseImage = async (selectionType) => {


const options = {

cameraType: 'back',

mediaType: selectionType,

includeBase64: true,

};

const result = await launchImageLibrary(options);

if (!result.didCancel && result.assets) {

if (selectionType === 'photo') {

const photoData = {

uri: result.assets[0].uri,

type: result.assets[0].type,

name: result.assets[0].fileName,

};

setThumbnail(photoData);

}

}

if (result.errorMessage) console.log('error');

};


const handleNextStepClick = async () => {

if (!thumbnail.length) {

setLoaderVisible(false);

if (!Object.keys(thumbnail).length) {

Alert.alert('Please add thumbnail image');

return;

} else {

return ImagePicker.openCropper({

includeBase64: true,

path: thumbnail,

cropping: false,

freeStyleCropEnabled: true,

compressImageQuality: 0.8,

showCropFrame: true,

mediaType: 'photo',

}).then(image => {

navigation.navigate('FilterScreen', { imageData: image });

})

}

}

};


return (

<SafeAreaView

style={styles.safeView}>

<View

style={styles.imageView}>

{Object.keys(thumbnail).length ? (

<>

<View

style={styles.insideView}>

<Image

source={{ uri: thumbnail?.uri }}

style={styles.thumbImage}

resizeMode={'contain'}

/>

</View>

<View

style={styles.editView}>

<TouchableOpacity

activeOpacity={0.6}

onPress={() => onChooseImage('photo')}

style={{

...styles.addLessonBtnContainer,

marginEnd: 7,

}}>

<Image

source={require('../../Assests/icon_edit.png')}

resizeMode="contain"

style={styles.editImage}

/>

</TouchableOpacity>

<TouchableOpacity

activeOpacity={0.6}

onPress={() => setThumbnail({})}

style={styles.addLessonBtnContainer}>

<Image

source={require('../../Assests/delete.png')}

resizeMode="contain"

style={styles.editImage}

/>

</TouchableOpacity>

</View>

</>

) : (

<>

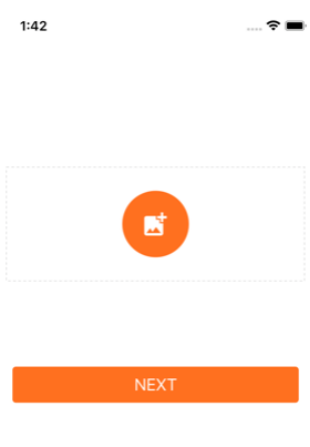
<View style={{ ...styles.pickContainer, }}>

<TouchableOpacity

onPress={() => onChooseImage('photo')}

activeOpacity={0.7}>

<View style={styles.galleryView}>

<Image

source={require('../../Assests/Pick.png')}

style={styles.galleryImg}

resizeMode="contain"

/>

</View>

</TouchableOpacity>

</View>

<View

style={styles.postTextView}>

<Text style={styles.introText}>

{Constants.create_post_story}

</Text>

</View>

</>

)}

</View>

<View style={styles.buttonView}>

<Button

title={Constants.next}

onclick={handleNextStepClick}

style={styles.button_next}

/>

</View>

<Loader titleText={''} visible={loaderVisible} />

</SafeAreaView>

);

};


const styles = StyleSheet.create({

button_next: {

textTransform: 'uppercase',

fontSize: wp('5%'),

color: 'white',

marginHorizontal: wp('7%')

},

editView: {

justifyContent: 'flex-end',

alignItems: 'center',

marginTop: wp('5%'),

alignSelf: 'flex-end',

display: 'flex',

flexDirection: 'row',

},

imageView: {

paddingHorizontal: wp('5%'),

paddingVertical: wp('10%'),

backgroundColor: '#FFFFFF',

marginTop: wp('5%'),

width: wp('100%'),

},

insideView: {

width: '100%',

justifyContent: 'center',

alignItems: 'center',

},

thumbImage: {

width: wp('100%'),

height: wp('80%'),

},

editImage: {

width: wp('4.5%'),

height: wp('4.5%'),

tintColor: '#FFFFFF',

},

galleryView: {

height: wp('20%'),

width: wp('20%'),

backgroundColor: '#FF701F',

borderRadius: 40,

justifyContent: 'center',

alignItems: 'center'

},

galleryImg: {

height: wp('7%'),

width: wp('7%'),

tintColor: 'white'

},

postTextView: {

marginTop: wp('5%'),

},

safeView: {

flex: 1,

backgroundColor: '#fff',

},

buttonView: {

marginTop: wp('7%'),

marginBottom: wp('3%')

},

pickContainer: {

borderWidth: 1,

borderColor: '#DFDFDF',

marginTop: hp('10%'),

justifyContent: 'center',

alignItems: 'center',

borderStyle: 'dashed',

width: '100%',

paddingVertical: wp('7%'),

},

addLessonBtnContainer: {

backgroundColor: '#FF701F',

borderRadius: 4,

paddingHorizontal: wp('3%'),

paddingVertical: wp('2%'),

},

introText: {

textTransform: 'uppercase',

textAlign: 'center',

textAlignVertical: 'center',

color: '#1F1F1F',

fontSize: wp('5%'),

},

});


export default CreatePost;

輸出

一旦完成上述代碼,并將其添加到之后,你就可以看到如圖2所示內容。

圖2:調用手機相冊

第2步:圖像裁剪和調整大小

在第一步中,我們已經在NEXT "按鈕上添加了一段代碼。因此,當你點擊“NEXT”對照片進行裁剪時,就會打開對應的用戶界面。用戶可以調整圖片的大小,也可以旋轉它,總之可以對其進行編輯。

選擇器提供各種圖像比例供用戶選取。一旦用戶點擊了選項按鈕,就會出現一個動作表視圖。現在,用戶可以選擇一個預定義的比例對照片進行裁剪了。

第3步:創建圖像過濾器

現在,選擇和裁剪功能已經準備好了。接下來,是時候添加圖像過濾功能了。現在讓我們創建一個新的文件夾,并命名為Filter Image"。再次,在新文件夾下面創建一個文件

import React, { useRef, useState, useEffect } from 'react';

import {

widthPercentageToDP as wp,

heightPercentageToDP as hp,

} from 'react-native-responsive-screen';

import {

FlatList,

Image,

SafeAreaView,

StyleSheet,

Text,

TouchableOpacity,

ImageBackground,

View,

} from 'react-native';

import { FILTERS } from '../../Helpers/Filters';

import Button from '../../Components/Button';

import Constants from '../../Constants/Constants';

import { KeyboardAwareScrollView } from 'react-native-keyboard-aware-scroll-view';


const FilterScreen = ({ navigation, route }) => {


const [selectedFilterIndex, setIndex] = useState(0);

const [image, SetImage] = useState('')

const [thumbnail, setThumbnail] = useState({});


useEffect(() => {

getImageFromNavigation()

})


const getImageFromNavigation = () => {

if (route?.params?.imageData) {

setThumbnail(route?.params?.imageData)

}

}


const onExtractImage = ({ nativeEvent }) => {

SetImage(nativeEvent.uri)

extractedUri.current = nativeEvent.uri;

};


const onSelectFilter = selectedIndex => {

setIndex(selectedIndex);

};


const extractedUri = useRef(thumbnail?.path);


const handleNextStepClick = async () => {

if (selectedFilterIndex === 0) {

navigation.navigate('ViewImage', { imageString: thumbnail })

} else {

console.log('goinfFromHere');

navigation.navigate('ViewImage', { imageString: image })

}

};


const renderFilterComponent = ({ item, index }) => {

const FilterComponent = item.filterComponent;

const image = (

<Image

style={styles.filterSelector}

source={{ uri: thumbnail?.path }}

defaultSource={require('../../Assests/Pick.png')}

/>

);

return (

<TouchableOpacity onPress={() => onSelectFilter(index)}>

<Text style={styles.filterTitle}>{item.title}</Text>

<FilterComponent image={image} />

</TouchableOpacity>

);

};


const SelectedFilterComponent = FILTERS[selectedFilterIndex].filterComponent;


return (

<>

<SafeAreaView

style={styles.safeView}>

<ImageBackground

source={require('../../Assests/image_background.png')}

style={styles.container}>


<KeyboardAwareScrollView

contentContainerStyle={styles.keyboardContainer}

resetScrollToCoords={{ x: 0, y: 0 }}>


{selectedFilterIndex === 0 ? (

<Image

style={styles.default_Img}

source={{ uri: thumbnail?.path }}

resizeMode='contain'

/>

) : Object.keys(thumbnail).length && (

<SelectedFilterComponent

onExtractImage={onExtractImage}

extractImageEnabled={true}

image={

<Image

style={styles.default_Img}

source={{ uri: thumbnail?.path }}

resizeMode='contain'

/>

}

/>

)}

<FlatList

data={FILTERS}

keyExtractor={item => item.title}

showsHorizontalScrollIndicator={false}

horizontal={true}

renderItem={renderFilterComponent}

/>

<View style={styles.buttonView}>

<Button

title={Constants.next}

onclick={handleNextStepClick}

style={{ textTransform: 'uppercase' }}

/>

</View>

</KeyboardAwareScrollView>

</ImageBackground>

</SafeAreaView>

</>

);

};

const styles = StyleSheet.create({

default_Img: {

flex: 1,

width: wp('100%'),

height: hp('50%'),

alignSelf: 'center',

alignContent: 'center'

},

keyboardContainer: {

width: wp('90%'),

},

buttonView: {

marginTop: wp('7%'),

marginBottom: wp('3%')

},

safeView: {

flex: 1,

backgroundColor: '#fff',

},

filterSelector: {

width: 100,

height: 100,

margin: 5,

},

filterTitle: {

marginTop: 70,

fontSize: 12,

textAlign: 'center',

},

container: {

flex: 1,

justifyContent: 'center',

backgroundColor: '#FFFFFF',

alignItems: 'center',

},

});

export default FilterScreen;

輸出

完成上述代碼之后,如圖3所示,應用程序的所有過濾器都是可見的了,用戶可以選擇任意一個濾鏡對圖片進行處理了。

圖 3:圖片過濾器應用

第4步:圖像保存和下載

完成上述功能之后,接著就需要編寫保存/下載圖片的功能,否則應用是玩不轉的。由于我們在上一步過濾器的基礎上添加下載功能的代碼。

和前面兩個步驟一樣,創建一個名為自定義圖片。

import React, { useState, useEffect } from 'react';

import {

View,

StyleSheet,

Image,

Platform,

PermissionsAndroid

} from 'react-native';

import { CameraRoll } from "@react-native-camera-roll/camera-roll";

import {

widthPercentageToDP as wp,

heightPercentageToDP as hp,

} from 'react-native-responsive-screen';

import Constants from '../../Constants/Constants';

import Button from '../../Components/Button';


const ViewImage = ({ route }) => {

const [thumbnail, setThumbnail] = useState({});

const [photos, setPhotos] = useState('');


useEffect(() => {

getImageFromNavigation()

})


const getImageFromNavigation = () => {

if (route?.params?.imageString) {

console.log('params-->', route?.params?.imageString);

setThumbnail(route?.params?.imageString)

setPhotos(route?.params?.imageString)

}

}

async function hasAndroidPermission() {

const permission = PermissionsAndroid.PERMISSIONS.WRITE_EXTERNAL_STORAGE;


const hasPermission = await PermissionsAndroid.check(permission);

if (hasPermission) {

return true;

}


const status = await PermissionsAndroid.request(permission);

return status === 'granted';

}


async function savePicture() {

if (Platform.OS === "android" && !(await hasAndroidPermission())) {

return;

}

CameraRoll.save(photos, { type: 'photo' })

};

return (

<View style={styles.container}>

<Image

source={{ uri: photos !== '' ? photos : thumbnail?.path }}

style={styles.imgView}

/>

<View style={styles.buttonView}>

<Button

title={Constants.image_download}

onclick={savePicture}

style={{ textTransform: 'uppercase' }}

/>

</View>

</View>

);

};


const styles = StyleSheet.create({

imgView: {

width: wp('100%'),

height: hp('30%'),

resizeMode: 'contain'

},

container: {

flex: 1,

alignItems: 'center',

backgroundColor: '#F5FCFF',

paddingTop: 30,

marginVertical: hp('25%')

},

buttonView: {

marginTop: wp('7%'),

marginBottom: wp('3%'),

width: wp('80%'),

},

});


export default ViewImage;

輸出結果如圖4 所示。

圖4:圖片下載

總結

根據上述指南,你已經完成了代碼的編寫。這里對整個指南稍做總結,在保證React Native安裝和配置的前提下,分別安裝圖像裁剪、圖像過濾和圖片下載的相關庫。然后,根據四步實現濾鏡功能的開發,包括:調用手機相冊、圖像裁剪和調整圖片大小、創建圖像過濾器以及保存和下載圖像。

譯者介紹

崔皓,51CTO社區編輯,資深架構師,擁有18年的軟件開發和架構經驗,10年分布式架構經驗。

原文標題:??A Guide to Implement Instagram-Like Filters in React Native??,作者:Kiran Beladiya


責任編輯:華軒 來源: 51CTO
相關推薦

2022-07-28 14:33:32

webviewweb頁面

2023-01-01 23:42:22

React框架暗黑模式

2017-06-20 12:48:55

React Nativ自定義模塊Note.js

2010-09-07 14:53:45

Chroma屬性CSS

2021-02-26 15:10:00

前端React組件交互

2022-07-15 09:01:15

React對象編程

2021-04-09 18:01:03

前端ReactDOM

2010-03-18 14:16:52

Java Thread

2022-11-15 18:31:37

React

2017-01-04 10:18:00

React NativScrollViewAndroid

2024-02-20 01:53:01

ReactFlutter開發

2021-05-23 15:46:23

React代碼前端

2016-08-11 16:48:10

ReactjQueryJavaScript

2016-11-23 16:48:20

react-nativandroidjavascript

2016-10-13 19:01:59

React NativUbuntu

2020-10-21 08:38:47

React源碼

2016-08-31 17:03:20

JavascriptReact NativWeb

2019-10-08 11:10:18

React自動保存前端

2015-09-22 09:50:36

FacebookAndroid

2016-08-12 08:49:46

React NativFacebookNative
點贊
收藏

51CTO技術棧公眾號

主站蜘蛛池模板: 国产a爽一区二区久久久 | 521av网站| 一级片免费网站 | 成人3d动漫一区二区三区91 | 91九色porny首页最多播放 | 亚洲精品大全 | 精品自拍视频在线观看 | 久久久久国产一区二区三区 | 天天看天天摸天天操 | 看片91| 岛国视频 | www.蜜桃av.com | 国产精品视频一二三区 | 亚洲综合无码一区二区 | 久久久久国产精品 | 成人在线免费观看视频 | 欧美激情精品久久久久久 | 日日夜夜精品视频 | 亚洲欧美日本在线 | 欧美精品一区二区三区蜜桃视频 | 精品99在线| 欧美日韩一二三区 | 久久精品日产第一区二区三区 | 欲色av | 欧美一区二区三区小说 | 国产成人高清在线观看 | 国产精品一区视频 | 中文字幕高清免费日韩视频在线 | 一区二区三区欧美 | 精品一区二区三区四区五区 | 国产在线观看一区二区三区 | 国产午夜精品久久久 | 国产精品久久国产精品 | 久久国产欧美日韩精品 | 亚洲成av人影片在线观看 | caoporn免费在线视频 | 日本特黄特色aaa大片免费 | 在线一区 | 国产精品视频在线播放 | 91嫩草精品 | 中文字幕一区二区三区乱码在线 |