實戰(zhàn):基于視覺 Transformer 的目標(biāo)檢測
目標(biāo)檢測是計算機(jī)視覺中的一項核心任務(wù),推動了從自動駕駛汽車到實時視頻監(jiān)控等技術(shù)的發(fā)展。它涉及在圖像中檢測和定位物體,而深度學(xué)習(xí)的最新進(jìn)展使這一任務(wù)更加準(zhǔn)確和高效。推動目標(biāo)檢測的最新創(chuàng)新之一是視覺Transformer(ViT),該模型通過其比傳統(tǒng)方法更好地捕捉全局上下文的能力,改變了圖像處理的格局。
在本文中,我們將詳細(xì)探討目標(biāo)檢測,介紹視覺Transformer的強(qiáng)大功能,并通過一個實際項目逐步演示如何使用ViT進(jìn)行目標(biāo)檢測。為了使項目更具吸引力,我們將創(chuàng)建一個交互式界面,允許用戶上傳圖像并查看實時目標(biāo)檢測結(jié)果。

一、目標(biāo)檢測簡介
目標(biāo)檢測是一種用于識別和定位圖像或視頻中物體的計算機(jī)視覺技術(shù)。可以將其視為教計算機(jī)識別貓、汽車甚至人等物體。通過在圖像中繪制這些物體的邊界框,我們可以確定每個物體在圖像中的位置。
目標(biāo)檢測的重要性:
- 自動駕駛汽車:實時識別行人、交通信號燈和其他車輛。
- 監(jiān)控:檢測和跟蹤視頻流中的可疑活動。
- 醫(yī)療保健:識別醫(yī)學(xué)掃描中的腫瘤和異常。
二、什么是視覺Transformer?
ViT最初由谷歌的研究人員提出。視覺Transformer(ViT)是一種前沿技術(shù),它使用最初為自然語言處理設(shè)計的Transformer架構(gòu)來理解和處理圖像。想象一下,將圖像分解成小塊(如拼圖),然后使用智能算法來識別這些小塊代表什么以及它們?nèi)绾谓M合在一起。
ViT與CNN的區(qū)別:
- CNN:通過卷積層高效識別局部模式(如邊緣、紋理)。
- ViT:從一開始就捕捉全局模式,使其更適合需要理解整個圖像上下文的任務(wù)。
三、Transformer架構(gòu)詳解
Transformer架構(gòu)最初是為機(jī)器翻譯等基于序列的自然語言處理任務(wù)設(shè)計的,現(xiàn)已被ViT用于視覺數(shù)據(jù)。以下是其工作原理的分解:
Transformer架構(gòu)的關(guān)鍵組件:

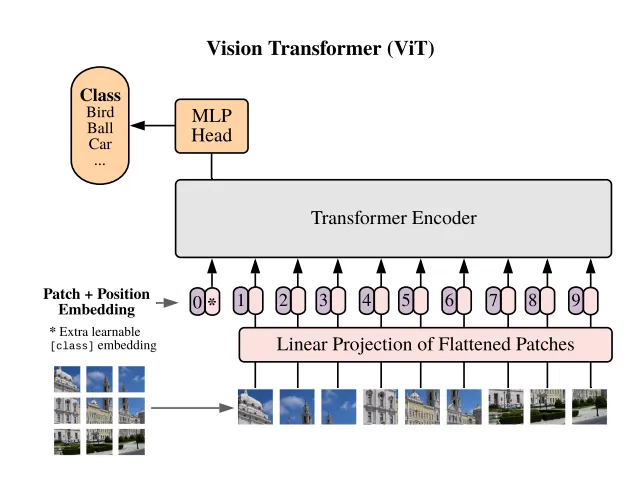
Vision Transformers 怎么處理圖像:
- Patch Embedding:將圖像分割成小塊(例如16x16像素),并將每個塊線性嵌入為向量。這些塊的處理方式類似于NLP任務(wù)中的單詞。
- 位置編碼:由于Transformer本身不理解空間信息,因此添加位置編碼以保留每個塊的相對位置。
- 自注意力機(jī)制:該機(jī)制允許模型同時關(guān)注圖像(或塊)的不同部分。每個塊學(xué)習(xí)與其他塊的關(guān)系權(quán)重,從而實現(xiàn)對圖像的全局理解。
- 分類:聚合輸出通過分類頭傳遞,模型預(yù)測圖像中存在哪些物體。
ViT相對于CNN的優(yōu)勢:
- 更好地捕捉全局上下文:ViT可以建模長距離依賴關(guān)系,使其更好地理解復(fù)雜場景。
- 適應(yīng)不同輸入尺寸:與CNN需要固定尺寸輸入不同,ViT可以適應(yīng)不同的圖像尺寸。
以下是一張比較視覺Transformer(ViT)與卷積神經(jīng)網(wǎng)絡(luò)(CNN)架構(gòu)的圖表:

四、項目設(shè)置
我們將使用PyTorch和預(yù)訓(xùn)練的視覺Transformer設(shè)置一個簡單的目標(biāo)檢測項目。確保已安裝以下必要的庫:
pip install torch torchvision matplotlib pillow ipywidgets這些庫的作用:
- PyTorch:加載并與預(yù)訓(xùn)練模型交互。
- torchvision:預(yù)處理圖像并應(yīng)用變換。
- matplotlib:可視化圖像和結(jié)果。
- pillow:圖像處理。
- ipywidgets:創(chuàng)建交互式UI以上傳和處理圖像。
五、使用ViT逐步實現(xiàn)目標(biāo)檢測
步驟1:加載并顯示圖像
我們將從加載網(wǎng)絡(luò)圖像并使用matplotlib顯示開始。
import torch
from torchvision import transforms
from PIL import Image
import requests
from io import BytesIO
import matplotlib.pyplot as plt

# Load an image from a URL
image_url = "https://upload.wikimedia.org/wikipedia/commons/2/26/YellowLabradorLooking_new.jpg"

# Use a user agent to avoid being blocked by the website
headers = {
    "User-Agent": "Mozilla/5.0 (Windows NT 10.0; Win64; x64) AppleWebKit/537.36 (KHTML, like Gecko) Chrome/114.0.0.0 Safari/537.36"
}

response = requests.get(image_url, headers=headers)

# Check if the request was successful
if response.status_code == 200:
    image = Image.open(BytesIO(response.content))

    # Display the image
    plt.imshow(image)
    plt.axis('off')
    plt.title('Original Image')
    plt.show()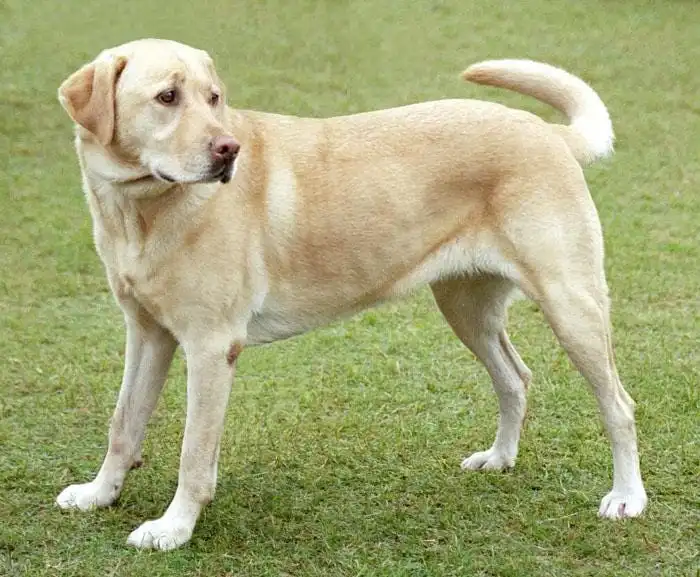
步驟2:預(yù)處理圖像
ViT期望在將圖像輸入模型之前對其進(jìn)行歸一化處理。
from torchvision import transforms

preprocess = transforms.Compose([
    transforms.Resize((224, 224)),
    transforms.ToTensor(),
    transforms.Normalize(mean=[0.485, 0.456, 0.406], std=[0.229, 0.224, 0.225]),
])

input_tensor = preprocess(image)
input_batch = input_tensor.unsqueeze(0)
步驟3:加載預(yù)訓(xùn)練的視覺Transformer模型
現(xiàn)在,我們將從PyTorch的torchvision中加載一個預(yù)訓(xùn)練的視覺Transformer模型。
from torchvision.models import vit_b_16

# Step 3: Load a pre-trained Vision Transformer model
model = vit_b_16(pretrained=True)
model.eval()  # Set the model to evaluation mode (no training happening here)

# Forward pass through the model
with torch.no_grad():  # No gradients are needed, as we are only doing inference
    output = model(input_batch)

# Output: This will be a classification result (e.g., ImageNet classes)
步驟4:解釋輸出
讓我們從ImageNet數(shù)據(jù)集中獲取預(yù)測的標(biāo)簽。
# Step 4: Interpret the output
from torchvision import models

# Load ImageNet labels for interpretation
imagenet_labels = requests.get("https://raw.githubusercontent.com/anishathalye/imagenet-simple-labels/master/imagenet-simple-labels.json").json()

# Get the index of the highest score
_, predicted_class = torch.max(output, 1)

# Display the predicted class
predicted_label = imagenet_labels[predicted_class.item()]
print(f"Predicted Label: {predicted_label}")

# Visualize the result
plt.imshow(image)
plt.axis('off')
plt.title(f"Predicted: {predicted_label}")
plt.show()
Predicted Label: Labrador Retriever六、構(gòu)建交互式圖像分類器
我們可以通過創(chuàng)建一個交互式工具使該項目更加用戶友好,用戶可以在該工具中上傳圖像或選擇樣本圖像進(jìn)行分類。為了使項目更具交互性,我們將使用ipywidgets創(chuàng)建一個用戶界面,用戶可以在其中上傳自己的圖像或選擇樣本圖像進(jìn)行目標(biāo)檢測。
import ipywidgets as widgets
from IPython.display import display, HTML, clear_output
from PIL import Image
import torch
import matplotlib.pyplot as plt
from io import BytesIO
import requests
from torchvision import transforms


# Preprocessing for the image
preprocess = transforms.Compose([
    transforms.Resize(256),
    transforms.CenterCrop(224),
    transforms.ToTensor(),
    transforms.Normalize(mean=[0.485, 0.456, 0.406], std=[0.229, 0.224, 0.225]),
])

# Create header with glowing title
header = HTML("""
    <div style='text-align:center; margin-bottom:20px;'>
        <h1 style='font-family: Arial, sans-serif; color: #ffe814; font-size: 40px; text-shadow: 0 0 8px #39FF14;'>
            Vision Transformer Object Detection
        </h1>
        <p style='font-family: Arial, sans-serif; color: #ff14b5; font-size:20px'>Upload an image or select a sample image from the cards below</p>
    </div>
""")

# Footer with signature
footer = HTML("""
    <div style='text-align:center; margin-top:20px;'>
        <p style='font-family: Arial, sans-serif; color: #f3f5f2; font-size:25px'>Powered by Vision Transformers | PyTorch | ipywidgets and Create by AI Innovators</p>
    </div>
""")

# Make upload button bigger and centered
upload_widget = widgets.FileUpload(accept='image/*', multiple=False)
upload_widget.layout = widgets.Layout(width='100%', height='50px')
upload_widget.style.button_color = '#007ACC'
upload_widget.style.button_style = 'success'

# Sample images (as cards)
sample_images = [
    ("Dog", "https://upload.wikimedia.org/wikipedia/commons/2/26/YellowLabradorLooking_new.jpg"),
    ("Cat", "https://upload.wikimedia.org/wikipedia/commons/b/b6/Felis_catus-cat_on_snow.jpg"),
    ("Car", "https://upload.wikimedia.org/wikipedia/commons/f/fc/Porsche_911_Carrera_S_%287522427256%29.jpg"),
    ("Bird", "https://upload.wikimedia.org/wikipedia/commons/3/32/House_sparrow04.jpg"),
    ("Laptop", "https://upload.wikimedia.org/wikipedia/commons/c/c9/MSI_Gaming_Laptop_on_wood_floor.jpg")
]

# Function to display and process image
def process_image(image):
    # Clear any previous outputs and predictions
    clear_output(wait=True)

    # Re-display header, upload button, and sample images after clearing
    display(header)
    display(upload_widget)
    display(sample_buttons_box)

    if image.mode == 'RGBA':
        image = image.convert('RGB')

    # Center and display the uploaded image
    plt.imshow(image)
    plt.axis('off')
    plt.title('Uploaded Image')
    plt.show()

    # Preprocess and make prediction
    input_tensor = preprocess(image)
    input_batch = input_tensor.unsqueeze(0)

    with torch.no_grad():
        output = model(input_batch)

    _, predicted_class = torch.max(output, 1)
    predicted_label = imagenet_labels[predicted_class.item()]

    # Display the prediction with space and style
    display(HTML(f"""
        <div style='text-align:center; margin-top:20px; font-size:30px; font-weight:bold; color:#39FF14; text-shadow: 0 0 8px #39FF14;'>
            Predicted: {predicted_label}
        </div>
    """))

    # Display footer after prediction
    display(footer)

# Function triggered by file upload
def on_image_upload(change):
    uploaded_image = Image.open(BytesIO(upload_widget.value[list(upload_widget.value.keys())[0]]['content']))
    process_image(uploaded_image)

# Function to handle sample image selection
def on_sample_image_select(image_url):
    # Define custom headers with a compliant User-Agent
    headers = {
        'User-Agent': 'MyBot/1.0 (your-email@example.com)'  # Replace with your bot's name and contact email
    }

    response = requests.get(image_url, stream=True, headers=headers)  # Added headers
    response.raise_for_status()
    img = Image.open(response.raw)
    process_image(img)

# Add a button for each sample image to the UI (as cards)
sample_image_buttons = [widgets.Button(description=label, layout=widgets.Layout(width='150px', height='150px')) for label, _ in sample_images]

# Link each button to its corresponding image
for button, (_, url) in zip(sample_image_buttons, sample_images):
    button.on_click(lambda b, url=url: on_sample_image_select(url))

# Display buttons horizontally
sample_buttons_box = widgets.HBox(sample_image_buttons, layout=widgets.Layout(justify_content='center'))

# Link the upload widget to the function
upload_widget.observe(on_image_upload, names='value')

# Display the complete UI
display(header)
display(upload_widget)  # Show file upload widget
display(sample_buttons_box)  # Display sample image cards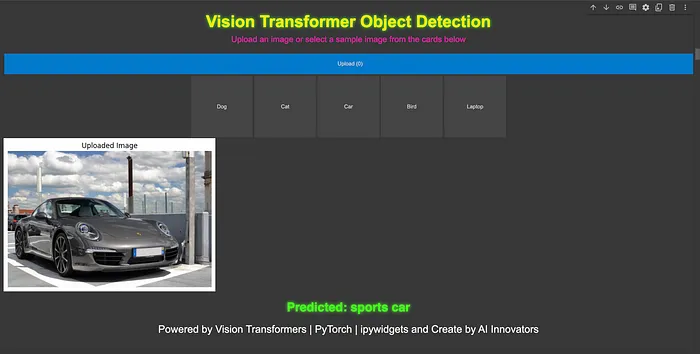
七、常見問題
Q1:視覺Transformer可以進(jìn)行微調(diào)嗎?是的,預(yù)訓(xùn)練的視覺Transformer可以在自定義數(shù)據(jù)集上進(jìn)行微調(diào),以用于目標(biāo)檢測和分割等任務(wù)。
Q2:ViT的計算成本高嗎?由于其自注意力機(jī)制,ViT的計算成本比CNN更高,尤其是在小型數(shù)據(jù)集上。
Q3:哪些數(shù)據(jù)集最適合訓(xùn)練ViT?像ImageNet這樣的大型數(shù)據(jù)集是訓(xùn)練ViT的理想選擇,因為與CNN相比,ViT在擴(kuò)展性方面具有優(yōu)勢。
八、后續(xù)步驟
現(xiàn)在你已經(jīng)學(xué)習(xí)了視覺Transformer的基礎(chǔ)知識,并使用PyTorch實現(xiàn)了目標(biāo)檢測。接下來,你可以嘗試在自定義數(shù)據(jù)集上微調(diào)ViT,或者探索其他基于Transformer的模型,例如DETR(Detection Transformer)。
九、結(jié)論
視覺Transformer(ViT)代表了計算機(jī)視覺領(lǐng)域的一次重大飛躍,為傳統(tǒng)的基于CNN的方法提供了一種全新的替代方案。通過利用Transformer架構(gòu)從一開始就捕捉全局上下文的能力,ViT在大型數(shù)據(jù)集上展現(xiàn)了令人印象深刻的性能。