深度學習:自動編碼器基礎和類型
很顯然,深度學習即將對我們的社會產生重大顯著的影響。Mobibit 創始人兼 CEO Pramod Chandrayan 近日在 codeburst.io 上發文對自動編碼器的基礎知識和類型進行了介紹并給出了代碼實例。
繼續我之前的文章《深度學習:什么&為什么?》(https://goo.gl/Ka3YoF),今天我們將進一步了解深度學習的架構類型,并詳細討論自動編碼器。
當人類大腦與深度學習機器合作時:
在我們開始揭秘深度網絡之前,讓我們先定義一下深度學習。根據我的理解:
| 深度學習是一種先進的機器學習技術,其中存在多個彼此通信的抽象層,每一層都與前一層深度相連,并根據前一層饋送的輸出進行決策。 |
Investopedia 將深度學習定義成:
| 深度學習是人工智能(AI)領域中機器學習中的一個子集,其有網絡狀的結構,可以從非結構化或無標記的數據中以無監督的方式學習。也被稱為深度神經學習或深度神經網絡。 |
今天我們將深入解讀無監督預訓練網絡(Unsupervised Pertained Networks)的工作方式。
UPN:無監督預訓練網絡
這種無監督學習網絡可以進一步分類成
- 自動編碼器
- 深度信念網絡(DBN)
- 生成對抗網絡(GAN)
自動編碼器是一種有三層的神經網絡:輸入層、隱藏層(編碼層)和解碼層。該網絡的目的是重構其輸入,使其隱藏層學習到該輸入的良好表征。
| 自動編碼器神經網絡是一種無監督機器學習算法,其應用了反向傳播,可將目標值設置成與輸入值相等。自動編碼器的訓練目標是將輸入復制到輸出。在內部,它有一個描述用于表征其輸入的代碼的隱藏層。 |
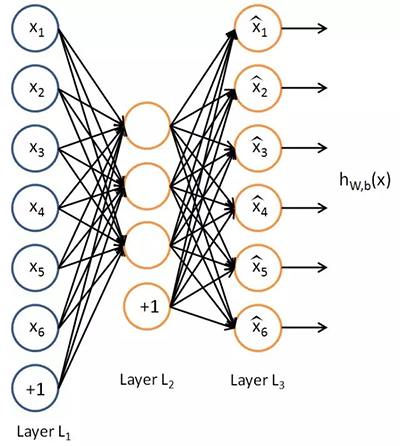
自動編碼器的目標是學習函數 h(x)≈x。換句話說,它要學習一個近似的恒等函數,使得輸出 x^ 近似等于輸入 x。自動編碼器屬于神經網絡家族,但它們也和 PCA(主成分分析)緊密相關。
關于自動編碼器的一些關鍵事實:
- 它是一種類似于 PCA 的無監督機器學習算法
- 它要最小化和 PCA 一樣的目標函數
- 它是一種神經網絡
- 這種神經網絡的目標輸出就是其輸入
盡管自動編碼器與 PCA 很相似,但自動編碼器比 PCA 靈活得多。在編碼過程中,自動編碼器既能表征線性變換,也能表征非線性變換;而 PCA 只能執行線性變換。因為自動編碼器的網絡表征形式,所以可將其作為層用于構建深度學習網絡。
自動編碼器的類型:
- 去噪自動編碼器
- 稀疏自動編碼器
- 變分自動編碼器(VAE)
- 收縮自動編碼器(CAE/contractive autoencoder)
A. 去噪自動編碼器
這是最基本的一種自動編碼器,它會隨機地部分采用受損的輸入來解決恒等函數風險,使得自動編碼器必須進行恢復或去噪。
這項技術可用于得到輸入的良好表征。良好的表征是指可以從受損的輸入穩健地獲得的表征,該表征可被用于恢復其對應的無噪聲輸入。
去噪自動編碼器背后的思想很簡單。為了迫使隱藏層發現更加穩健的特征并且為了防止其只是學習其中的恒等關系,我們在訓練自動編碼器時會讓其從受損的版本中重建輸入。
應用在輸入上的噪聲量以百分比的形式呈現。一般來說,30% 或 0.3 就很好,但如果你的數據非常少,你可能就需要考慮增加更多噪聲。
堆疊的去噪自動編碼器(SDA):
")
這是一種在層上使用了無監督預訓練機制的去噪自編碼器,其中當一層被預訓練用于在之前層的輸入上執行特征選擇和特征提取后,后面會跟上一個監督式的微調(fine-tuning)階段。SDA 只是將很多個去噪自動編碼器融合在了一起。一旦前面 k 層訓練完成,我們就可以訓練第 k+1 層,因為我們現在可以根據下面的層計算代碼或隱含表征。
一旦所有層都預訓練完成,網絡就會進入一個被稱為微調的階段。在這里我們會為微調使用監督學習機制,以最小化被監督任務上的預測誤差。然后,我們以訓練多層感知器的方式訓練整個網絡。在這個階段,我們僅考慮每個自動編碼器的編碼部分。這個階段是有監督的,自此以后我們就在訓練中使用目標類別了。
使用代碼示例解釋 SDA
這一節源自 deeplearning.net(對于想要理解深度學習的人來說,這個網站提供了很好的參考),其中使用案例對堆疊的去噪自動編碼器進行了很好的解釋。
我們可以以兩種方式看待堆疊的去噪自動編碼器:一是自動編碼器列表,二是多層感知器(MLP)。在預訓練過程中,我們使用了***種方式,即我們將我們的模型看作是一組自動編碼器列表,并分開訓練每個自動編碼器。在第二個訓練階段,我們使用第二種方式。這兩種方式是有聯系的,因為:
自動編碼器和 MLP 的 sigmoid 層共享參數;
MLP 的中間層計算出的隱含表征被用作自動編碼器的輸入。
- class SdA(object):
- """Stacked denoising auto-encoder class (SdA)
- A stacked denoising autoencoder model is obtained by stacking several
- dAs. The hidden layer of the dA at layer `i` becomes the input of
- the dA at layer `i+1`. The first layer dA gets as input the input of
- the SdA, and the hidden layer of the last dA represents the output.
- Note that after pretraining, the SdA is dealt with as a normal MLP,
- the dAs are only used to initialize the weights.
- """
- def __init__(
- self,
- numpy_rng,
- theano_rng=None,
- n_ins=784,
- hidden_layers_sizes=[500, 500],
- n_outs=10,
- corruption_levels=[0.1, 0.1]
- ):
- """ This class is made to support a variable number of layers.
- :type numpy_rng: numpy.random.RandomState
- :param numpy_rng: numpy random number generator used to draw initial
- weights
- :type theano_rng: theano.tensor.shared_randomstreams.RandomStreams
- :param theano_rng: Theano random generator; if None is given one is
- generated based on a seed drawn from `rng`
- :type n_ins: int
- :param n_ins: dimension of the input to the sdA
- :type hidden_layers_sizes: list of ints
- :param hidden_layers_sizes: intermediate layers size, must contain
- at least one value
- :type n_outs: int
- :param n_outs: dimension of the output of the network
- :type corruption_levels: list of float
- :param corruption_levels: amount of corruption to use for each
- layer
- """
- self.sigmoid_layers = []
- self.dA_layers = []
- self.params = []
- self.n_layers = len(hidden_layers_sizes)
- assert self.n_layers > 0
- if not theano_rng:
- theano_rng = RandomStreams(numpy_rng.randint(2 ** 30))
- # allocate symbolic variables for the data
- self.x = T.matrix('x') # the data is presented as rasterized images
- self.y = T.ivector('y') # the labels are presented as 1D vector of
- # [int] labels
self.sigmoid_layers 將會存儲 MLP 形式的 sigmoid 層,而 self.dA_layers 將會存儲與該 MLP 層關聯的去噪自動編碼器。接下來,我們構建 n_layers sigmoid 層和 n_layers 去噪自動編碼器,其中 n_layers 是我們的模型的深度。我們使用了多層感知器中引入的 HiddenLayer 類,但有一項修改:我們將 tanh 非線性替換成了 logistic 函數
![]()
我們鏈接了 sigmoid 層來構建一個 MLP,而且我們在構建自動編碼器時使得每個自動編碼器的編碼部分都與其對應的 sigmoid 層共享權重矩陣和偏置。
- for i in range(self.n_layers):
- # construct the sigmoidal layer
- # the size of the input is either the number of hidden units of
- # the layer below or the input size if we are on the first layer
- if i == 0:
- input_size = n_ins
- else:
- input_size = hidden_layers_sizes[i - 1]
- # the input to this layer is either the activation of the hidden
- # layer below or the input of the SdA if you are on the first
- # layer
- if i == 0:
- layer_input = self.x
- else:
- layer_input = self.sigmoid_layers[-1].output
- sigmoid_layer = HiddenLayer(rng=numpy_rng,
- input=layer_input,
- n_in=input_size,
- n_out=hidden_layers_sizes[i],
- activation=T.nnet.sigmoid)
- # add the layer to our list of layers
- self.sigmoid_layers.append(sigmoid_layer)
- # its arguably a philosophical question...
- # but we are going to only declare that the parameters of the
- # sigmoid_layers are parameters of the StackedDAA
- # the visible biases in the dA are parameters of those
- # dA, but not the SdA
- self.params.extend(sigmoid_layer.params)
- # Construct a denoising autoencoder that shared weights with this
- # layer
- dAdA_layer = dA(numpy_rngnumpy_rng=numpy_rng,
- theano_rngtheano_rng=theano_rng,
- input=layer_input,
- n_visible=input_size,
- n_hidden=hidden_layers_sizes[i],
- W=sigmoid_layer.W,
- bhid=sigmoid_layer.b)
- self.dA_layers.append(dA_layer)
現在我們只需要在這個 sigmoid 層上添加一個 logistic 層即可,這樣我們就有了一個 MLP。我們將使用 LogisticRegression 類,這個類是在使用 logistic 回歸分類 MNIST 數字時引入的。
- # We now need to add a logistic layer on top of the MLP
- self.logLayer = LogisticRegression(
- input=self.sigmoid_layers[-1].output,
- n_in=hidden_layers_sizes[-1],
- n_out=n_outs
- )
- self.params.extend(self.logLayer.params)
- # construct a function that implements one step of finetunining
- # compute the cost for second phase of training,
- # defined as the negative log likelihood
- selfself.finetune_cost = self.logLayer.negative_log_likelihood(self.y)
- # compute the gradients with respect to the model parameters
- # symbolic variable that points to the number of errors made on the
- # minibatch given by self.x and self.y
- selfself.errors = self.logLayer.errors(self.y)
SdA 類也提供了一種為其層中的去噪自動編碼器生成訓練函數的方法。它們會作為一個列表返回,其中元素 i 是一個函數——該函數實現了訓練對應于第 i 層的 dA 的步驟。
- def pretraining_functions(self, train_set_x, batch_size):
- ''' Generates a list of functions, each of them implementing one
- step in trainnig the dA corresponding to the layer with same index.
- The function will require as input the minibatch index, and to train
- a dA you just need to iterate, calling the corresponding function on
- all minibatch indexes.
- :type train_set_x: theano.tensor.TensorType
- :param train_set_x: Shared variable that contains all datapoints used
- for training the dA
- :type batch_size: int
- :param batch_size: size of a [mini]batch
- :type learning_rate: float
- :param learning_rate: learning rate used during training for any of
- the dA layers
- '''
- # index to a [mini]batch
- index = T.lscalar('index') # index to a minibatch
為了修改訓練過程中的受損水平或學習率,我們將它們與 Theano 變量聯系了起來。
- corruption_level = T.scalar('corruption') # % of corruption to use
- learning_rate = T.scalar('lr') # learning rate to use
- # begining of a batch, given `index`
- batch_begin = index * batch_size
- # ending of a batch given `index`
- batch_end = batch_begin + batch_size
- pretrain_fns = []
- for dA in self.dA_layers:
- # get the cost and the updates list
- cost, updates = dA.get_cost_updates(corruption_level,
- learning_rate)
- # compile the theano function
- fn = theano.function(
- inputs=[
- index,
- theano.In(corruption_level, value=0.2),
- theano.In(learning_rate, value=0.1)
- ],
- outputs=cost,
- updatesupdates=updates,
- givens={
- self.x: train_set_x[batch_begin: batch_end]
- }
- )
- # append `fn` to the list of functions
- pretrain_fns.append(fn)
- return pretrain_fns
現在任意 pretrain_fns[i] 函數都可以使用索引參數了,可選的有 corruption(受損水平)或 lr(學習率)。注意這些參數名是在它們被構建時賦予 Theano 變量的名字,而不是 Python 變量(learning_rate 或 corruption_level)的名字。在使用 Theano 時一定要記住這一點。我們用同樣的方式構建了用于構建微調過程中所需函數的方法(train_fn、valid_score 和 test_score)。
- def build_finetune_functions(self, datasets, batch_size, learning_rate):
- '''Generates a function `train` that implements one step of
- finetuning, a function `validate` that computes the error on
- a batch from the validation set, and a function `test` that
- computes the error on a batch from the testing set
- :type datasets: list of pairs of theano.tensor.TensorType
- :param datasets: It is a list that contain all the datasets;
- the has to contain three pairs, `train`,
- `valid`, `test` in this order, where each pair
- is formed of two Theano variables, one for the
- datapoints, the other for the labels
- :type batch_size: int
- :param batch_size: size of a minibatch
- :type learning_rate: float
- :param learning_rate: learning rate used during finetune stage
- '''
- (train_set_x, train_set_y) = datasets[0]
- (valid_set_x, valid_set_y) = datasets[1]
- (test_set_x, test_set_y) = datasets[2]
- # compute number of minibatches for training, validation and testing
- n_valid_batches = valid_set_x.get_value(borrow=True).shape[0]
- n_valid_batches //= batch_size
- n_test_batches = test_set_x.get_value(borrow=True).shape[0]
- n_test_batches //= batch_size
- index = T.lscalar('index') # index to a [mini]batch
- # compute the gradients with respect to the model parameters
- gparams = T.grad(self.finetune_cost, self.params)
- # compute list of fine-tuning updates
- updates = [
- (param, param - gparam * learning_rate)
- for param, gparam in zip(self.params, gparams)
- ]
- train_fn = theano.function(
- inputs=[index],
- outputs=self.finetune_cost,
- updatesupdates=updates,
- givens={
- self.x: train_set_x[
- index * batch_size: (index + 1) * batch_size
- ],
- self.y: train_set_y[
- index * batch_size: (index + 1) * batch_size
- ]
- },
- )
- test_score_i = theano.function(
- [index],
- self.errors,
- givens={
- self.x: test_set_x[
- index * batch_size: (index + 1) * batch_size
- ],
- self.y: test_set_y[
- index * batch_size: (index + 1) * batch_size
- ]
- },
- )
- valid_score_i = theano.function(
- [index],
- self.errors,
- givens={
- self.x: valid_set_x[
- index * batch_size: (index + 1) * batch_size
- ],
- self.y: valid_set_y[
- index * batch_size: (index + 1) * batch_size
- ]
- },
- )
- # Create a function that scans the entire validation set
- def valid_score():
- return [valid_score_i(i) for i in range(n_valid_batches)]
- # Create a function that scans the entire test set
- def test_score():
- return [test_score_i(i) for i in range(n_test_batches)]
- return train_fn, valid_score, test_score
注意,valid_score 和 test_score 并不是 Theano 函數,而是分別在整個驗證集和整個測試集上循環的 Python 函數,可以在這些集合上產生一個損失列表。
總結
下面給出的幾行代碼就構建了一個堆疊的去噪自動編碼器:
- numpynumpy_rng = numpy.random.RandomState(89677)
- print('... building the model')
- # construct the stacked denoising autoencoder class
- sda = SdA(
- numpy_rngnumpy_rng=numpy_rng,
- n_ins=28 * 28,
- hidden_layers_sizes=[1000, 1000, 1000],
- n_outs=10
- )
該網絡的訓練分兩個階段:逐層的預訓練,之后是微調。
對于預訓練階段,我們將在網絡的所有層上進行循環。對于每個層,我們都將使用編譯過的實現 SGD 步驟的函數,以優化權重,從而降低該層的重構成本。這個函數將根據 pretraining_epochs 在訓練集上執行固定數量的 epoch。
- #########################
- # PRETRAINING THE MODEL #
- #########################
- print('... getting the pretraining functions')
- pretraining_fns = sda.pretraining_functions(train_set_xtrain_set_x=train_set_x,
- batch_sizebatch_size=batch_size)
- print('... pre-training the model')
- start_time = timeit.default_timer()
- ## Pre-train layer-wise
- corruption_levels = [.1, .2, .3]
- for i in range(sda.n_layers):
- # go through pretraining epochs
- for epoch in range(pretraining_epochs):
- # go through the training set
- c = []
- for batch_index in range(n_train_batches):
- c.append(pretraining_fns[i](index=batch_index,
- corruption=corruption_levels[i],
- lr=pretrain_lr))
- print('Pre-training layer %i, epoch %d, cost %f' % (i, epoch, numpy.mean(c, dtype='float64')))
- end_time = timeit.default_timer()
- print(('The pretraining code for file ' +
- os.path.split(__file__)[1] +
- ' ran for %.2fm' % ((end_time - start_time) / 60.)), file=sys.stderr)
這里的微調循環和多層感知器中的微調過程很相似。唯一的區別是它使用了 build_finetune_functions 給出的函數。
執行代碼
用戶可以通過調用以下 Python CLI 來運行該代碼:
- python code/SdA.py
默認情況下,該代碼會為每一層運行 15 次預訓練 epoch,其批大小為 1。***層的受損水平為 0.1,第二層為 0.2,第三層為 0.3。預訓練的學習率為 0.001,微調學習率為 0.1。預訓練耗時 585.01 分鐘,每 epoch 平均 13 分鐘。微調經歷了 36 epoch,耗時 444.2 分鐘,每 epoch 平均 12.34 分鐘。***的驗證分數是 1.39%,測試分數是 1.3%。這些結果是在配置了 Intel Xeon E5430 @ 2.66GHz CPU 的機器上得到的,它有單線程的 GotoBLAS。
原文:https://codeburst.io/deep-learning-types-and-autoencoders-a40ee6754663
【本文是51CTO專欄機構“機器之心”的原創譯文,微信公眾號“機器之心( id: almosthuman2014)”】