Java線程池實現原理與技術,看這一篇就夠了
01.***制線程的缺點
多線程的軟件設計方法確實可以***限度地發揮多核處理器的計算能力,提高生產系統的吞吐量和性能。但是,若不加控制和管理的隨意使用線程,對系統的性能反而會產生不利的影響。
一種最為簡單的線程創建和回收的方法類似如下:
- new Thread(new Runnable() {
- @Override
- public void run() {
- //do sth
- }
- }).start();
以上代碼創建了一條線程,并在run()方法結束后,自動回收該線程。在簡單的應用系統中,這段代碼并沒有太多問題。但是在真實的生產環境中,系統由于真實環境的需要,可能會開啟很多線程來支撐其應用。而當線程數量過大時,反而會耗盡CPU和內存資源。
首先,雖然與進程相比,線程是一種輕量級的工具,但其創建和關閉依然需要花費時間,如果為每一個小的任務都創建一個線程,很有可能出現創建和銷毀線程所占用的時間大于該線程真實工作所消耗的時間,反而會得不償失。
其次,線程本身也是要占用內存空間的,大量的線程會搶占寶貴的內部資源。
因此,在實際生產環境中,線程的數量必須得到控制。盲目地大量創建線程對系統性能是有傷害的。
02.簡單的線程池實現
下面給出一個最簡單的線程池,該線程池不是一個完善的線程池,但已經實現了一個基本線程池的核心功能,有助于快速理解線程池的實現。
1.線程池的實現
- public class ThreadPool {
- private static ThreadPool instance = null;
- //空閑的線程隊列
- private List<PThread> idleThreads;
- //已有的線程總數
- private int threadCounter;
- private boolean isShutDown = false;
- private ThreadPool() {
- this.idleThreads = new Vector<>(5);
- threadCounter = 0;
- }
- public int getCreatedThreadCounter() {
- return threadCounter;
- }
- //取得線程池的實例
- public synchronized static ThreadPool getInstance() {
- if (instance == null) {
- instance = new ThreadPool();
- }
- return instance;
- }
- //將線程池放入池中
- protected synchronized void repool(PThread repoolingThread) {
- if (!isShutDown) {
- idleThreads.add(repoolingThread);
- } else {
- repoolingThread.shutDown();
- }
- }
- //停止池中所有線程
- public synchronized void shutDown() {
- isShutDown = true;
- for (int threadIndex = 0; threadIndex < idleThreads.size(); threadIndex++) {
- PThread pThread = idleThreads.get(threadIndex);
- pThread.shutDown();
- }
- }
- //執行任務
- public synchronized void start(Runnable target) {
- PThread thread = null;
- //如果有空閑線程,則直接使用
- if (idleThreads.size() > 0) {
- int lastIndex = idleThreads.size() - 1;
- thread = idleThreads.get(lastIndex);
- idleThreads.remove(thread);
- //立即執行這個任務
- thread.setTarget(target);
- }//沒有空閑線程,則創建線程
- else {
- threadCounter++;
- //創建新線程
- thread = new PThread(target, "PThread #" + threadCounter, this);
- //啟動這個線程
- thread.start();
- }
- }
- }
2.要實現上面的線程池,就需要一個永不退出的線程與之配合。PThread就是一個這樣的線程。它的主體部分是一個***循環,該線程在手動關閉前永不結束,并一直等待新的任務到達。
- public class PThread extends Thread {
- //線程池
- private ThreadPool pool;
- //任務
- private Runnable target;
- private boolean isShutDown = false;
- private boolean isIdle = false; //是否閑置
- //構造函數
- public PThread(Runnable target,String name, ThreadPool pool){
- super(name);
- this.pool = pool;
- this.target = target;
- }
- public Runnable getTarget(){
- return target;
- }
- public boolean isIdle() {
- return isIdle;
- }
- @Override
- public void run() {
- //只要沒有關閉,則一直不結束該線程
- while (!isShutDown){
- isIdle = false;
- if (target != null){
- //運行任務
- target.run();
- }
- try {
- //任務結束了,到閑置狀態
- isIdle = true;
- pool.repool(this);
- synchronized (this){
- //線程空閑,等待新的任務到來
- wait();
- }
- } catch (InterruptedException e) {
- e.printStackTrace();
- }
- isIdle = false;
- }
- }
- public synchronized void setTarget(Runnable newTarget){
- target = newTarget;
- //設置了任務之后,通知run方法,開始執行這個任務
- notifyAll();
- }
- //關閉線程
- public synchronized void shutDown(){
- isShutDown = true;
- notifyAll();
- }
- }
3.測試Main方法
- public static void main(String[] args) throws InterruptedException {
- for (int i = 0; i < 1000; i++) {
- ThreadPool.getInstance().start(new Runnable() {
- @Override
- public void run() {
- try {
- //休眠100ms
- Thread.sleep(100);
- } catch (InterruptedException e) {
- e.printStackTrace();
- }
- }
- });
- }
- }
03ThreadPoolExecutor
為了能夠更好地控制多線程,JDK提供了一套Executor框架,幫助開發人員有效地進行線程控制。Executor框架無論是newFixedThreadPool()方法、newSingleThreadExecutor()方法還是newCachedThreadPool()方法,其內部實現均使用了 ThreadPoolExecutor:
- public static ExecutorService newCachedThreadPool() {
- return new ThreadPoolExecutor(0, Integer.MAX_VALUE,
- 60L, TimeUnit.SECONDS,
- new SynchronousQueue<Runnable>());
- }
- public static ExecutorService newFixedThreadPool(int nThreads) {
- return new ThreadPoolExecutor(nThreads, nThreads,
- 0L, TimeUnit.MILLISECONDS,
- new LinkedBlockingQueue<Runnable>());
- }
- public static ExecutorService newSingleThreadExecutor() {
- return new FinalizableDelegatedExecutorService
- (new ThreadPoolExecutor(1, 1,
- 0L, TimeUnit.MILLISECONDS,
- new LinkedBlockingQueue<Runnable>()));
- }
由以上線程池的實現代碼可以知道,它們只是對 ThreadPoolExecutor 類的封裝。為何 ThreadPoolExecutor 類有如此強大的功能?來看一下 ThreadPoolExecutor 最重要的構造方法。
3.1 構造方法
ThreadPoolExecutor最重要的構造方法如下:
- public ThreadPoolExecutor(int corePoolSize, int maximumPoolSize, long keepAliveTime, TimeUnit unit, BlockingQueue workQueue, ThreadFactory threadFactory, RejectedExecutionHandler handler)
方法參數如下:
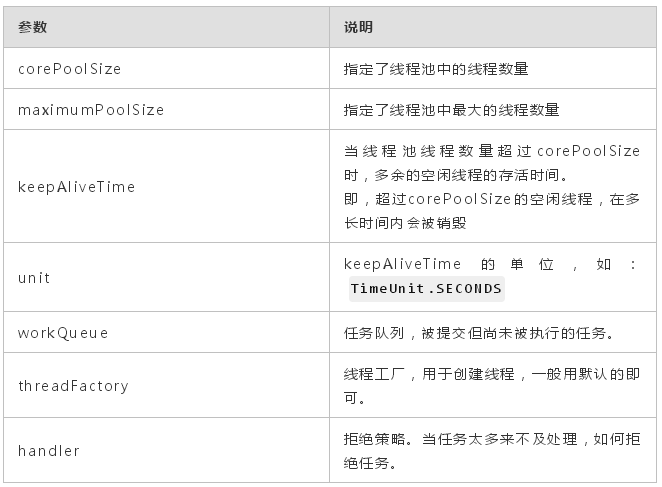
ThreadPoolExecutor的使用示例,通過execute()方法提交任務。
- public static void main(String[] args) {
- ThreadPoolExecutor executor = new ThreadPoolExecutor(4, 5, 0, TimeUnit.SECONDS, new LinkedBlockingQueue<>());
- for (int i = 0; i < 10; i++) {
- executor.execute(new Runnable() {
- @Override
- public void run() {
- System.out.println(Thread.currentThread().getName());
- }
- });
- }
- executor.shutdown();
- }
或者通過submit()方法提交任務
- public static void main(String[] args) throws ExecutionException, InterruptedException {
- ThreadPoolExecutor executor = new ThreadPoolExecutor(4, 5, 0, TimeUnit.SECONDS, new LinkedBlockingQueue<>());
- List<Future> futureList = new Vector<>();
- //在其它線程中執行100次下列方法
- for (int i = 0; i < 100; i++) {
- futureList.add(executor.submit(new Callable<String>() {
- @Override
- public String call() throws Exception {
- return Thread.currentThread().getName();
- }
- }));
- }
- for (int i = 0;i<futureList.size();i++){
- Object o = futureList.get(i).get();
- System.out.println(o.toString());
- }
- executor.shutdown();
- }
運行結果:
- ...
- pool-1-thread-4
- pool-1-thread-3
- pool-1-thread-2
下面主要講解ThreadPoolExecutor的構造方法中workQueue和RejectedExecutionHandler參數,其它參數都很簡單。
3.2 workQueue任務隊列
用于保存等待執行的任務的阻塞隊列。可以選擇以下幾個阻塞隊列。
- ArrayBlockingQueue: 是一個基于數組結構的有界阻塞隊列,按FIFO原則進行排序
- LinkedBlockingQueue: 一個基于鏈表結構的阻塞隊列,吞吐量高于ArrayBlockingQueue。靜態工廠方法Excutors.newFixedThreadPool()使用了這個隊列
- SynchronousQueue: 一個不存儲元素的阻塞隊列。每個插入操作必須等到另一個線程調用移除操作,否則插入操作一直處于阻塞狀態,吞吐量高于LinkedBlockingQueue,靜態工廠方法Excutors.newCachedThreadPool()使用了這個隊列
- PriorityBlockingQueue: 一個具有優先級的***阻塞隊列。
3.3 RejectedExecutionHandler飽和策略
當隊列和線程池都滿了,說明線程池處于飽和狀態,那么必須采取一種策略還處理新提交的任務。它可以有如下四個選項:
- AbortPolicy : 直接拋出異常,默認情況下采用這種策略
- CallerRunsPolicy : 只用調用者所在線程來運行任務
- DiscardOldestPolicy : 丟棄隊列里最近的一個任務,并執行當前任務
- DiscardPolicy : 不處理,丟棄掉
更多的時候,我們應該通過實現RejectedExecutionHandler 接口來自定義策略,比如記錄日志或持久化存儲等。
3.4 submit()與execute()
可以使用execute和submit兩個方法向線程池提交任務。
execute方法用于提交不需要返回值的任務,利用這種方式提交的任務無法得知是否正常執行
submit方法用于提交一個任務并帶有返回值,這個方法將返回一個Future類型對象。可以通過這個返回對象判斷任務是否執行成功,并且可以通過future.get()方法來獲取返回值,get()方法會阻塞當前線程直到任務完成。
3.5 shutdown()與shutdownNow()
可以通過調用 shutdown() 或 shutdownNow() 方法來關閉線程池。它們的原理是遍歷線程池中的工作線程,然后逐個調用線程的 interrupt 方法來中斷線程,所以無法響應中斷的任務可能永遠無法停止。
這倆方法的區別是,shutdownNow() 首先將線程池的狀態設置成STOP,然后嘗試停止所有的正在執行或暫停任務的線程,并返回等待執行任務的列表,而 shutdown() 只是將線程池的狀態設置成 SHUTDOWN 狀態,然后中斷所有沒有正在執行任務的線程。
只要調用了這兩個關閉方法的任意一個,isShutdown 方法就會返回 true。當所有的任務都已關閉了,才表示線程池關閉成功,這時調用 isTerminaced 方法會返回 true。
通常調用 shutdown() 方法來關閉線程池,如果任務不一定要執行完,則可以調用 shutdownNow() 方法。
3.6 合理配置線程池
要想合理地配置線程池,首先要分析任務特性
- 任務的性質:CPU密集型任務、IO密集型任務和混合型任務。
- 任務的優先級:高、中和低。
- 任務的執行時間:長、中和短。
- 任務的依賴性:是否依賴其他系統資源,如數據庫連接。
性質不同的任務可以用不同規模的線程池分開處理。
CPU密集型任務應該配置盡可能少的線程,如配置N+1個線程,N位CPU的個數。
而IO密集型任務線程并不是一直在執行任務,則應配置盡可能多的線程,如2*N。
混合型任務,如果可以拆分,將其拆分成一個CPU密集型任務和一個IO密集型任務,只要這兩個任務執行的時間相差不是太大,那么分解后執行的吞吐量將高于串行執行的吞吐量。如果這兩個任務執行的時間相差很大,則沒有必要進行分解。可以通過Runtime.getRuntime().availableProcessors()方法獲得當前設備的CPU個數。
優先級不同的任務可以使用優先級隊列PriorityBlockingQueue來處理。它可以讓優先級高的任務先執行。
3.7 線程池的監控
由于大量的使用線程池,所以很有必要對其進行監控。可以通過繼承線程池來自定義線程池,重寫線程池的beforeExecute、afterExecute 和 terminated 方法,也可以在任務執行前,執行后和線程池關閉前執行一些代碼來進行監控。在監控線程池的時候可以使用一下屬性:
(1) taskCount:線程池需要執行的任務數量
(2) completedTaskCount:線程池在運行過程中已完成的任務數量,小于或等于taskCount
(3) largestPoolSize: 線程池里曾經創建過***的線程數量。通過這個數據可以知道線程池是否曾經滿過。如該數值等于線程池***大小,則表示線程池曾經滿過。
(4) getPoolSize:線程池的線程數量。如果線程池不銷毀的話,線程池里的線程不會自動銷毀,所以這個大小只增不減。
(5) getActiveCount:獲取活動的線程數
04Executor多線程框架
ThreadPoolExecutor 表示一個線程池,Executors 類則扮演著線程池工廠的角色,通過 Executors 可以取得一個特定功能的線程池。
使用 Executors 框架實現上節中的例子,其代碼如下:
- public static void main(String[] args) {
- //新建一個線程池
- ExecutorService executor = Executors.newCachedThreadPool();
- //在其它線程中執行100次下列方法
- for (int i = 0; i < 100; i++) {
- executor.execute(new Runnable() {
- @Override
- public void run() {
- System.out.println(Thread.currentThread().getName());
- }
- });
- }
- //執行完關閉
- executor.shutdown();
- }
4.1 Executors框架的結構
1.任務
包括被執行任務需要實現的接口:Runnable 接口或 Callable 接口。
2.任務的執行
包括任務執行機制的核心接口 Executor,以及繼承自 Executor 的ExecutorService 接口。Executor框架有兩個關鍵類實現了 ExecutorService 接口(ThreadPoolExecutor 和 ScheduledThreadPoolExecutor)。
3.異步計算的結果
包括接口 Future 和實現Future接口的FutureTask類。
4.2 Executors工廠方法
Executors工廠類的主要方法:
- public static ExecutorService newFixedThreadPool(int nThreads)
該方法返回一個固定線程數量的線程池,該線程池中的線程數量始終不變。當有一個新的任務提交時,線程池中若有空閑線程,則立即執行。若沒有,則新的任務會被暫存在一個任務隊列中,待有線程空閑時,便處理在任務隊列中的任務。
- public static ExecutorService newSingleThreadExecutor()
該方法返回一個只有一個線程的線程池。若多余一個任務被提交到線程池,任務會被保存在一個任務隊列中,待線程空閑,按先入先出的順序執行隊列中的任務。
- public static ExecutorService newCachedThreadPool()
該方法返回一個可根據實際情況調整線程數量的線程池。線程池的線程數量不確定,但若有空閑線程可以復用,則會優先使用可復用的線程。但所有線程均在工作,又有新的任務提交,則會創建新的線程處理任務。所有線程在當前任務執行完畢后,將返回線程池進行復用。
- public static ScheduledExecutorService newSingleThreadScheduledExecutor()
該方法返回一個ScheduledExecutorService對象,線程池大小為1。ScheduledExecutorService接口在ExecutorService接口之上擴展了在給定時間執行某任務的功能,如在某個固定的延時之后執行,或者周期性執行某個任務。
- public static ScheduledExecutorService newScheduledThreadPool(int corePoolSize)
該方法也返回一個 ScheduledExecutorService 對象,但該線程池可以指定線程數量。
4.3 ThreadPoolExecutor與ScheduledThreadPoolExecutor
在前面提到了Executors 類扮演著線程池工廠的角色,通過 Executors 可以取得一個特定功能的線程池。Executors 工廠類的主要方法可以創建 ThreadPoolExecutor 和 ScheduledThreadPoolExecutor 線程池。
關于ThreadPoolExecutor ,前面第3節已經詳細敘述。ScheduledThreadPoolExecutor 也是ExecutorService接口的實現類,可以在給定的延遲后運行命令,或者定期執行命令。ScheduledThreadPoolExecutor 比 Timer 更靈活,功能更強大。
4.4 Future與FutureTask
上面的示例中使用 execute() 方法提交任務,用于提交不需要返回值的任務。如果我們需要獲取執行任務之后的返回值,可以使用submit()方法。
示例代碼:
- public static void main(String[] args) throws InterruptedException, ExecutionException {
- //新建一個線程池
- ExecutorService executor = Executors.newCachedThreadPool();
- List<Future> futureList = new Vector<>();
- //在其它線程中執行100次下列方法
- for (int i = 0; i < 100; i++) {
- futureList.add(executor.submit(new Callable<String>() {
- @Override
- public String call() throws Exception {
- return Thread.currentThread().getName()+" "+System.currentTimeMillis()+" ";
- }
- }));
- }
- for (int i = 0;i<futureList.size();i++){
- Object o = futureList.get(i).get();
- System.out.println(o.toString()+i);
- }
- executor.shutdown();
- }
運行結果:
- ...
- pool-1-thread-11 1537872778612 96
- pool-1-thread-11 1537872778613 97
- pool-1-thread-10 1537872778613 98
- pool-1-thread-10 1537872778613 99
到這里,就不得不提Future接口與FutureTask實現類,它們代表異步計算的結果。
- Future<T> submit(Callable<T> task)
- Future<?> submit(Runnable task);
- Future<T> submit(Runnable task, T result);
當我們submit()提交后,會返回一個Future對象,到JDK1.8,返回的實際是FutureTask實現類。submit() 方法支持 Runnable 或 Callable 類型的參數。Runnable 接口 和Callable 接口的區別就是 Runnable 不會返回結果,Callable 會返回結果。
主線程可以執行 futureTask.get() 方法來阻塞當前線程直到任務執行完成,任務完成后返回任務執行的結果。
futureTask.get(long timeout, TimeUnit unit) 方法則會阻塞當前線程一段時間立即返回,這時候有可能任務沒有執行完。
主線程也可以執行 futureTask.cancel(boolean mayInterruptIfRunning) 來取消此任務的執行。
futureTask.isCancelled方法表示任務是否被取消成功,如果在任務正常完成前被取消成功,則返回 true。
futureTask.isDone方法表示任務是否已經完成,若任務完成,則返回true。