干貨 | 手把手教你用115行代碼做個數獨解析器!
你也是數獨愛好者嗎?
Aakash Jhawar和許多人一樣,樂于挑戰新的難題。上學的時候,他每天早上都要玩數獨。長大后,隨著科技的進步,我們可以讓計算機來幫我們解數獨了!只需要點擊數獨的圖片,它就會為你填滿全部九宮格。
叮~ 這里有一份數獨解析教程,等待你查收~ 喜歡收藏硬核干貨的小伙伴看過來~
我們都知道,數獨由9×9的格子組成,每行、列、宮各自都要填上1-9的數字,要做到每行、列、宮里的數字都不重復。
可以將解析數獨的整個過程分成3步:
第一步:從圖像中提取數獨
第二步:提取圖像中出現的每個數字
第三步:用算法計算數獨的解
第一步:從圖像中提取數獨
首先需要進行圖像處理。
1、對圖像進行預處理
首先,我們應用高斯模糊的內核大小(高度,寬度)為9的圖像。注意,內核大小必須是正的和奇數的,并且內核必須是平方的。然后使用11個最近鄰像素自適應閾值。
- proc = cv2.GaussianBlur(img.copy(),(9,9),0)
- proc = cv2.adaptiveThreshold(proc,255,cv2.ADAPTIVE_THRESH_GAUSSIAN_C,cv2.THRESH_BINARY,11,2)
為了使網格線具有非零像素值,我們顛倒顏色。此外,把圖像放大,以增加網格線的大小。
- proc = cv2.bitwise_not(proc,proc)
- kernel = np.array([[0。,1.,0.],[1.,1.,1.],[0.,1.,0.]] ,np.uint8)
- proc = cv2.dilate(proc,kernel)
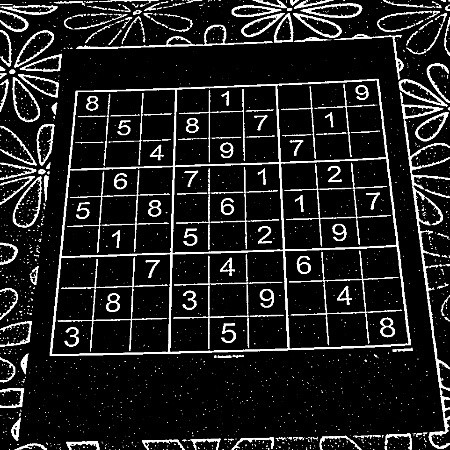
閾值化后的數獨圖像
2、找出最大多邊形的角
下一步是尋找圖像中最大輪廓的4個角。所以需要找到所有的輪廓線,按面積降序排序,然后選擇面積最大的那個。
- _, contours, h = cv2.findContours(img.copy(), cv2.RETR_EXTERNAL, cv2.CHAIN_APPROX_SIMPLE)
- contours = sorted(contours, key=cv2.contourArea, reverse=True)
- polygon = contours[0]
使用的操作符。帶有max和min的itemgetter允許我們獲得該點的索引。每個點都是有1個坐標的數組,然后[0]和[1]分別用于獲取x和y。
右下角點具有最大的(x + y)值;左上角有點最小(x + y)值;左下角則具有最小的(x - y)值;右上角則具有最大的(x - y)值。
- bottom_right, _ = max(enumerate([pt[0][0] + pt[0][1] for pt in
- polygon]), key=operator.itemgetter(1))
- top_left, _ = min(enumerate([pt[0][0] + pt[0][1] for pt in
- polygon]), key=operator.itemgetter(1))
- bottom_left, _ = min(enumerate([pt[0][0] - pt[0][1] for pt in
- polygon]), key=operator.itemgetter(1))
- top_right, _ = max(enumerate([pt[0][0] - pt[0][1] for pt in
- polygon]), key=operator.itemgetter(1))
現在我們有了4個點的坐標,然后需要使用索引返回4個點的數組。每個點都在自己的一個坐標數組中。
- [polygon[top_left][0], polygon[top_right][0], polygon[bottom_right][0], polygon[bottom_left][0]]

最大多邊形的四個角
3、裁剪和變形圖像
有了數獨的4個坐標后,我們需要剪裁和彎曲一個矩形部分,從一個圖像變成一個類似大小的正方形。由左上、右上、右下和左下點描述的矩形。
注意:將數據類型顯式設置為float32或‘getPerspectiveTransform’會引發錯誤。
- top_left, top_right, bottom_right, bottom_left = crop_rect[0], crop_rect[1], crop_rect[2], crop_rect[3]
- src = np.array([top_left, top_right, bottom_right, bottom_left], dtype= float32 )
- side = max([ distance_between(bottom_right, top_right),
- distance_between(top_left, bottom_left),
- distance_between(bottom_right, bottom_left),
- distance_between(top_left, top_right) ])
用計算長度的邊來描述一個正方形,這是要轉向的新視角。然后要做的是通過比較之前和之后的4個點來得到用于傾斜圖像的變換矩陣。最后,再對原始圖像進行變換。
- dst = np.array([[0, 0], [side - 1, 0], [side - 1, side - 1], [0, side - 1]], dtype= float32 )
- m = cv2.getPerspectiveTransform(src, dst)
- cv2.warpPerspective(img, m, (int(side), int(side)))
裁剪和變形后的數獨圖像
4、從正方形圖像中推斷網格
從正方形圖像推斷出81個單元格。我們在這里交換 j 和 i ,這樣矩形就被存儲在從左到右讀取的列表中,而不是自上而下。
- squares = []
- side = img.shape[:1]
- sideside = side[0] / 9
- for j in range(9):
- for i in range(9):
- p1 = (i * side, j * side) #Top left corner of a box
- p2 = ((i + 1) * side, (j + 1) * side) #Bottom right corner
- squares.append((p1, p2)) return squares
5、得到每一位數字
下一步是從其單元格中提取數字并構建一個數組。
- digits = []
- img = pre_process_image(img.copy(), skip_dilate=True)
- for square in squares:
- digits.append(extract_digit(img, square, size))
extract_digit 是從一個數獨方塊中提取一個數字(如果有的話)的函數。它從整個方框中得到數字框,使用填充特征查找來獲得框中間的最大特征,以期在邊緣找到一個屬于該數字的像素,用于定義中間的區域。接下來,需要縮放并填充數字,讓適合用于機器學習的數字大小的平方。同時,我們必須忽略任何小的邊框。
- def extract_digit(img, rect, size):
- digit = cut_from_rect(img, rect)
- h, w = digit.shape[:2]
- margin = int(np.mean([h, w]) / 2.5)
- _, bbox, seed = find_largest_feature(digit, [margin, margin], [w
- - margin, h - margin])
- digit = cut_from_rect(digit, bbox)
- w = bbox[1][0] - bbox[0][0]
- h = bbox[1][1] - bbox[0][1]
- if w > 0 and h > 0 and (w * h) > 100 and len(digit) > 0:
- return scale_and_centre(digit, size, 4)
- else:
- return np.zeros((size, size), np.uint8)
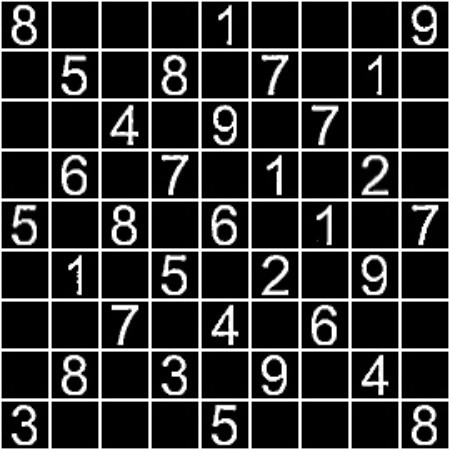
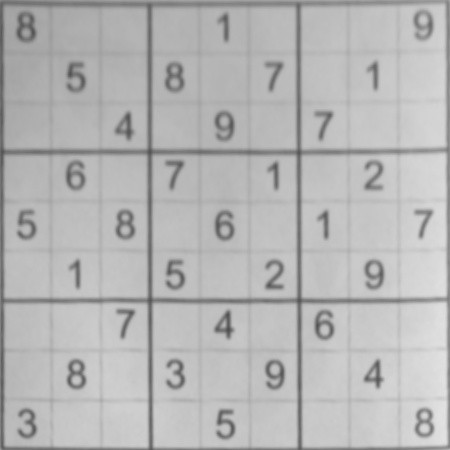
最后的數獨的形象
現在,我們有了最終的數獨預處理圖像,下一個任務是提取圖像中的每一位數字,并將其存儲在一個矩陣中,然后通過某種算法計算出數獨的解。
第二步:提取圖像中出現的每個數字
對于數字識別,我們將在MNIST數據集上訓練神經網絡,該數據集包含60000張0到9的數字圖像。從導入所有庫開始。
- import numpy
- import cv2from keras.datasets
- import mnistfrom keras.models
- import Sequentialfrom keras.layers
- import Densefrom keras.layers
- import Dropoutfrom keras.layers
- import Flattenfrom keras.layers.convolutional
- import Conv2Dfrom keras.layers.convolutional
- import MaxPooling2Dfrom keras.utils
- import np_utilsfrom keras
- import backend as K
- import matplotlib.pyplot as plt
需要修復隨機種子以確保可重復性。
- K.set_image_dim_ordering( th )
- seed = 7numpy.random.seed(seed)
- (X_train, y_train), (X_test, y_test) = mnist.load_data()
然后將圖像重塑為樣本*像素*寬度*高度,并輸入從0-255規范化為0-1。在此之后,對輸出進行熱編碼。
- X_trainX_train = X_train.reshape(X_train.shape[0], 1, 28,
- 28).astype( float32 )
- X_testX_test = X_test.reshape(X_test.shape[0], 1, 28,
- 28).astype( float32 )
- X_trainX_train = X_train / 255
- X_testX_test = X_test / 255
- y_train = np_utils.to_categorical(y_train)
- y_test = np_utils.to_categorical(y_test)
- num_classes = y_test.shape[1]
接下來,我們將創建一個模型來預測手寫數字。
- model = Sequential()
- model.add(Conv2D(32, (5, 5), input_shape=(1, 28, 28),
- activation= relu ))
- model.add(MaxPooling2D(pool_size=(2, 2)))model.add(Conv2D(16, (3,
- 3), activation= relu ))
- model.add(MaxPooling2D(pool_size=(2, 2)))
- model.add(Dropout(0.2))
- model.add(Flatten())
- model.add(Dense(128, activation= relu ))
- model.add(Dense(64, activation= relu ))
- model.add(Dense(num_classes, activation= softmax ))
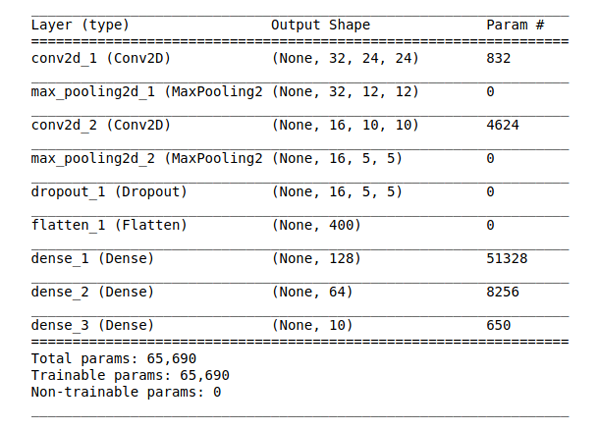
模型總結
在創建模型之后,需要進行編譯,使其適合數據集并對其進行評估。
- model.compile(loss= categorical_crossentropy , optimizer= adam ,
- metrics=[ accuracy ])
- model.fit(X_train, y_train, validation_data=(X_test, y_test),
- epochs=10, batch_size=200)
- scores = model.evaluate(X_test, y_test, verbose=0)
- print("Large CNN Error: %.2f%%" % (100-scores[1]*100))
現在,可以測試上面創建的模型了。
- test_images = X_test[1:5]
- test_imagestest_images = test_images.reshape(test_images.shape[0], 28, 28)
- print ("Test images shape: {}".format(test_images.shape))
- for i, test_image in enumerate(test_images, start=1):
- org_image = test_image
- test_imagetest_image = test_image.reshape(1,1,28,28)
- prediction = model.predict_classes(test_image, verbose=0)
- print ("Predicted digit: {}".format(prediction[0]))
- plt.subplot(220+i)
- plt.axis( off )
- plt.title("Predicted digit: {}".format(prediction[0]))
- plt.imshow(org_image, cmap=plt.get_cmap( gray ))
- plt.show()
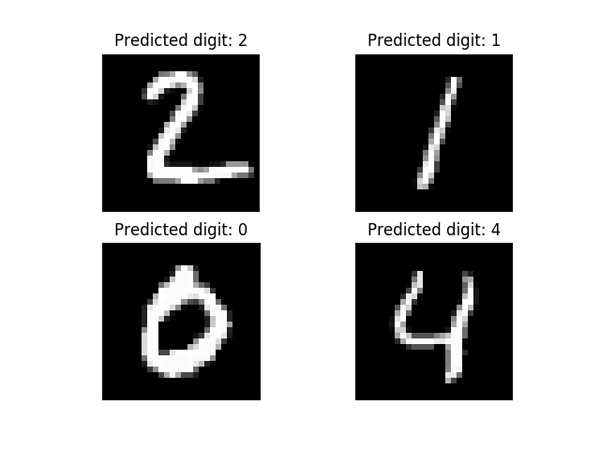
手寫體數字分類模型的預測數字
神經網絡的精度為98.314%!最后,保存序列模型,這樣就不必在需要使用它的時候反復訓練了。
- # serialize model to JSON
- modelmodel_json = model.to_json()
- with open("model.json", "w") as json_file:
- json_file.write(model_json)
- # serialize weights to HDF5
- model.save_weights("model.h5")
- print("Saved model to disk")
更多關于手寫數字識別的信息:
https://github.com/aakashjhawar/Handwritten-Digit-Recognition
下一步是加載預先訓練好的模型。
- json_file = open( model.json , r )
- loaded_model_json = json_file.read()
- json_file.close()
- loaded_model = model_from_json(loaded_model_json)
- loaded_model.load_weights("model.h5")
調整圖像大小,并將圖像分割成9x9的小圖像。每個小圖像的數字都是從1-9。
- sudoku = cv2.resize(sudoku, (450,450))
- grid = np.zeros([9,9])
- for i in range(9):
- for j in range(9):
- image = sudoku[i*50:(i+1)*50,j*50:(j+1)*50]
- if image.sum() > 25000:
- grid[i][j] = identify_number(image)
- else:
- grid[i][j] = 0
- gridgrid = grid.astype(int)
identify_number 函數拍攝數字圖像并預測圖像中的數字。
- def identify_number(image):
- image_resize = cv2.resize(image, (28,28)) # For plt.imshow
- image_resizeimage_resize_2 = image_resize.reshape(1,1,28,28) # For input to model.predict_classes
- # cv2.imshow( number , image_test_1)
- loaded_modelloaded_model_pred = loaded_model.predict_classes(image_resize_2
- , verbose = 0)
- return loaded_model_pred[0]
完成以上步驟后,數獨網格看起來是這樣的:
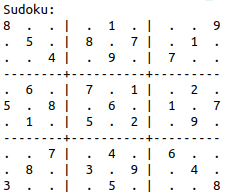
提取的數獨
第三步:用回溯算法計算數獨的解
我們將使用回溯算法來計算數獨的解。
在網格中搜索仍未分配的條目。如果找到引用參數行,col 將被設置為未分配的位置,而 true 將被返回。如果沒有未分配的條目保留,則返回false。“l” 是 solve_sudoku 函數傳遞的列表變量,用于跟蹤行和列的遞增。
- def find_empty_location(arr,l):
- for row in range(9):
- for col in range(9):
- if(arr[row][col]==0):
- l[0]=row
- l[1]=col
- return True
- return False
返回一個boolean,指示指定行的任何賦值項是否與給定數字匹配。
- def used_in_row(arr,row,num):
- for i in range(9):
- if(arr[row][i] == num):
- return True
- return False
返回一個boolean,指示指定列中的任何賦值項是否與給定數字匹配。
- def used_in_col(arr,col,num):
- for i in range(9):
- if(arr[i][col] == num):
- return True
- return False
返回一個boolean,指示指定的3x3框內的任何賦值項是否與給定的數字匹配。
- def used_in_box(arr,row,col,num):
- for i in range(3):
- for j in range(3):
- if(arr[i+row][j+col] == num):
- return True
- return False
檢查將num分配給給定的(row, col)是否合法。檢查“ num”是否尚未放置在當前行,當前列和當前3x3框中。
- def check_location_is_safe(arr,row,col,num):
- return not used_in_row(arr,row,num) and
- not used_in_col(arr,col,num) and
- not used_in_box(arr,row - row%3,col - col%3,num)
采用部分填入的網格,并嘗試為所有未分配的位置分配值,以滿足數獨解決方案的要求(跨行、列和框的非重復)。“l” 是一個列表變量,在 find_empty_location 函數中保存行和列的記錄。將我們從上面的函數中得到的行和列賦值給列表值。
- def solve_sudoku(arr):
- l=[0,0]
- if(not find_empty_location(arr,l)):
- return True
- row=l[0]
- col=l[1]
- for num in range(1,10):
- if(check_location_is_safe(arr,row,col,num)):
- arr[row][col]=num
- if(solve_sudoku(arr)):
- return True
- # failure, unmake & try again
- arr[row][col] = 0
- return False
最后一件事是print the grid。
- def print_grid(arr):
- for i in range(9):
- for j in range(9):
- print (arr[i][j])
- print ( )
最后,把所有的函數整合在主函數中。
- def sudoku_solver(grid):
- if(solve_sudoku(grid)):
- print( --- )
- else:
- print ("No solution exists")
- gridgrid = grid.astype(int)
- return grid
這個函數的輸出將是最終解出的數獨。

最終的解決方案
當然,這個解決方案絕不是萬無一失的,處理圖像時仍然會出現一些問題,要么無法解析,要么解析錯誤導致無法處理。不過,我們的目標是探索新技術,從這個角度來看,這個項目還是有價值的。