開發板漂流計劃之小車控制由簡入繁之UDP控制
1.簡介
在#開發板漂流計劃#小車控制由簡入繁之按鍵控制的基礎上,實現小車上電后自動連接到指定WIFI,并建立UDP Server監聽指定端口數據。電腦端作為UDP Client 連接到小車對應的端口,通過發送字符串來控制小車狀態。
以下代碼基于OpenHarmony-v3.0-LTS編譯測試。
2.WIFI連接的實現
wifi連接的代碼使用了潤和Gitee中的wifi_connecter.c和wifi_connecter.h將這兩個文件分別放到car目錄下的src和include中,修改Car 目錄下BUILD.gn和car_main.c添加如下代碼,詳細修改說明如下:
2.1.在applications\sample\wifi-iot\app\car\BUILD.gn中添加sources中添加編譯wifi_connecter.c
- static_library("car") {
- sources = [
- ......
- "src/wifi_connecter.c",
- ]
- }
2.2.在applications\sample\wifi-iot\app\car\BUILD.gn中include_dirs 里面添加//applications/sample/wifi-iot/app/car/include這樣wifi_connecter.h等就可以包到了,另外因為wifi_connecter.h中有用到wifi_device.h所以需要再把//foundation/communication/wifi_lite/interfaces/wifiservice加入。wifi_connecter.h中的"lwip/netifapi.h"和 “lwip/api_shell.h” 是在"//device/hisilicon/hispark_pegasus/sdk_liteos/third_party/lwip_sack/include"中也需要,所以需要添加以下路徑。
- include_dirs = [
- ......
- "//applications/sample/wifi-iot/app/car/include",
- "//foundation/communication/wifi_lite/interfaces/wifiservice",
- "//device/hisilicon/hispark_pegasus/sdk_liteos/third_party/lwip_sack/include",
- ]
2.3 在car_main.c中參考如下修改,將wifi_connecter.h加入include,"SSIDABCD"改成你要連接的WIFI SSID, "MIMA1234"填入WIFI密碼。
- #include "wifi_connecter.h"
- ......
- static void CarDemoTask(void *arg)
- {
- ......
- // setup your AP params
- WifiDeviceConfig apConfig = {0};
- strcpy(apConfig.ssid, "SSIDABCD");
- strcpy(apConfig.preSharedKey, "MIMA1234");
- apConfig.securityType = WIFI_SEC_TYPE_PSK;
- int netId = ConnectToHotspot(&apConfig);
- printf("[CarDemo] ConnectToHotspot done netId=%d!\n",netId);
- }
securityType 的enum 如下按照你的WIFI設定的加密方式來選擇,
- typedef enum {
- /** Invalid security type */
- WIFI_SEC_TYPE_INVALID = -1,
- /** Open */
- WIFI_SEC_TYPE_OPEN,
- /** Wired Equivalent Privacy (WEP) */
- WIFI_SEC_TYPE_WEP,
- /** Pre-shared key (PSK) */
- WIFI_SEC_TYPE_PSK,
- /** Simultaneous Authentication of Equals (SAE) */
- WIFI_SEC_TYPE_SAE,
- } WifiSecurityType;
通過ConnectToHotspot()就可以輕松的連接到指定WIFI了。
3.UDP Server的實現
3.1 UDP Server的實現代碼
在hispark_pegasus中可以使用"//device/hisilicon/hispark_pegasus/sdk_liteos/third_party/lwip_sack/include"(該目錄在WIFI連接的實現中已添加)中的"lwip/sockets.h"來實現,代碼如下
- #include "lwip/sockets.h"
- static char response[] = "\nSucess.\n";
- static char message[128] = "";
- void UdpServer(unsigned short port)
- {
- ssize_t retval = 0;
- int needfb = 0;
- int sockfd = socket(AF_INET, SOCK_DGRAM, 0); // UDP socket
- struct sockaddr_in clientAddr = {0};
- socklen_t clientAddrLen = sizeof(clientAddr);
- struct sockaddr_in serverAddr = {0};
- serverAddr.sin_family = AF_INET;
- serverAddr.sin_port = htons(port);
- serverAddr.sin_addr.s_addr = htonl(INADDR_ANY);
- retval = bind(sockfd, (struct sockaddr *)&serverAddr, sizeof(serverAddr));
- if (retval < 0) {
- printf("bind failed, %ld!\r\n", retval);
- goto do_cleanup;
- }
- printf("bind to port %d success!\r\n", port);
- while(1)
- {
- needfb = 0;
- memset(message, 0, sizeof(message));
- retval = recvfrom(sockfd, message, sizeof(message), 0, (struct sockaddr *)&clientAddr, &clientAddrLen);
- if (retval > 0) {
- printf("recv message {%s} %ld done!\r\n", message, retval);
- printf("peer info: ipaddr = %s, port = %d\r\n", inet_ntoa(clientAddr.sin_addr), ntohs(clientAddr.sin_port));
- if(strncmp("forward", message, 7)== 0) {
- needfb = 1;
- car_go_forward();
- }
- if(strncmp("back", message, 4) == 0) {
- needfb = 1;
- car_go_back();
- }
- if(strncmp("left", message, 4) == 0) {
- needfb = 1;
- car_turn_left();
- }
- if(strncmp("right", message, 5) == 0) {
- needfb = 1;
- car_turn_right();
- }
- if(strncmp("stop", message, 4) == 0) {
- needfb = 1;
- car_stop();
- }
- if(needfb == 1) {
- retval = sendto(sockfd, response, strlen(response), 0, (struct sockaddr *)&clientAddr, sizeof(clientAddr));
- if (retval > 0) {
- printf("send response {%s} %ld done!\r\n", response, retval);
- } else {
- printf("send failed, %ld!\r\n", retval);
- }
- }
- }
- }
- do_cleanup:
- printf("do_cleanup...\r\n");
- close(sockfd);
- }
需要注意的是在每次檢查數據recvfrom()前memset(message, 0, sizeof(message))清一下之前的數據。
在收到"forward"、“back”、“left”、“right”、“stop"后會執行相應的小車控制函數,并回復"Sucess”。
3.2 UDP Server的調用
在Task 最后面調用UdpServer()傳入端口函數即可,這里端口使用62021
- static void CarDemoTask(void *arg)
- {
- ......
- UdpServer(62021);
- printf("[CarDemo] create CarDemoTask!\n");
- }
4.編譯
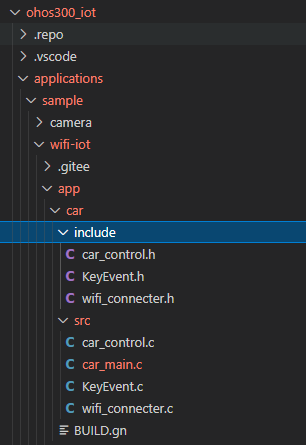
4.1 將附件car.zip 解壓后放到applications\sample\wifi-iot\app\下,如下圖
4.2 修改applications/sample/wifi-iot/app/BUILD.gn
- import("//build/lite/config/component/lite_component.gni")
- lite_component("app") {
- features = [
- "car",
- ]
- }
4.3 電機的控制需要用到PWM,所以需要先將PWM 功能開啟,開啟方式如下
device/hisilicon/hispark_pegasus/sdk_liteos/build/config/usr_config.mk
- # CONFIG_PWM_SUPPORT is not set
改為
- CONFIG_PWM_SUPPORT=y
4.4 進入代碼根目錄執行hb set輸入.(當前目錄)并選擇wifiiot_hispark_pegasus,執行 hb build -b release -f
- soon@soon-u20:~/ohos300_iot $ hb set
- [OHOS INFO] Input code path: .
- OHOS Which product do you need? wifiiot_hispark_pegasus
- soon@soon-u20:~/ohos300_iot $ hb build -b release -f
4.5 使用HiBurn或者Visual Studio Code燒錄,可參考
5.功能測試
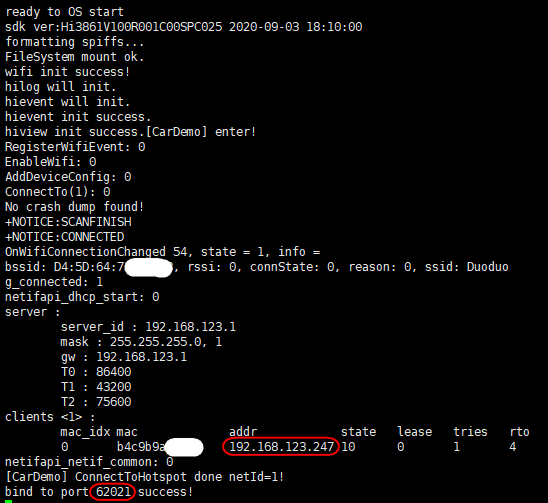
5.1 從串口日志獲取小車IP,如下圖成功連接WIFI獲取IP 打印如下,如我這邊獲取的IP為192.168.123.247
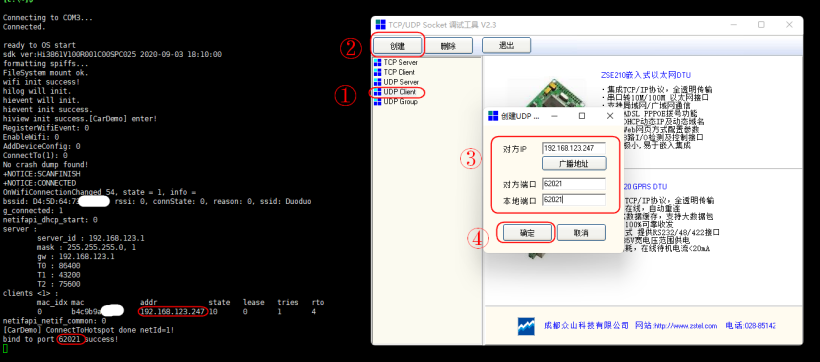
5.2 電腦端測試軟件如附件SocketTool2.zip ,解壓后直接運行按下圖步驟創建UDP Client,
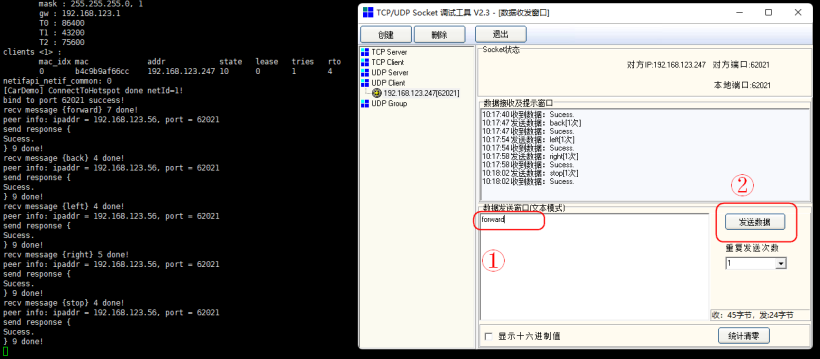
建立連接后就可以在數據發送窗口中發送文本數據"forward"、“back”、“left”、“right”、"stop"來控制小車了,小車接受成功后回復Sucess如下圖。
6.總結
本案例實現了一個簡單的UDP控制小車的Demo,但是缺少狀態反饋,如WIFI是否連接成功,連接成功后IP的顯示,這一部分讀者可以再利用OLED屏幕來完善。
文中相關設備來源于51CTO 鴻蒙技術社區【開發板漂流計劃】
https://harmonyos.51cto.com/resource/1289
https://harmonyos.51cto.com/resource/1290