實現最先進的蒙版自編碼器(MAE)
作者:二旺
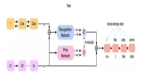
今天,我深入探討視覺變換器之后計算機視覺領域最重要的突破之一:蒙版自編碼器(MAE)。
今天,我深入探討視覺變換器之后計算機視覺領域最重要的突破之一:蒙版自編碼器(MAE)。簡要回顧一下它的工作原理:
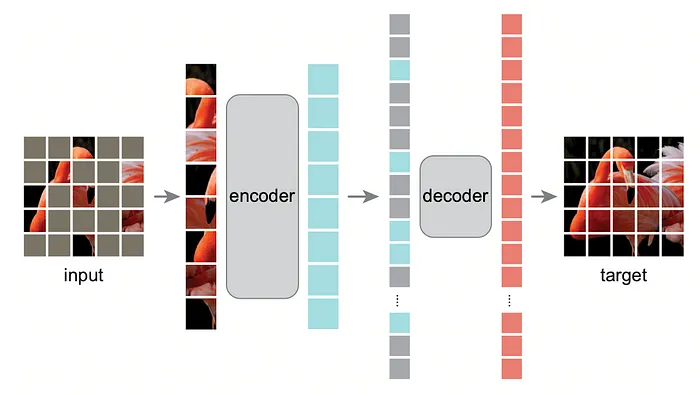
以下是工作步驟:
- 圖像被分割成塊。
- 這些塊的一個子集被隨機蒙版。
- 只有可見的塊被送入編碼器(這很關鍵)。
- 解碼器接收編碼器的壓縮表示,并嘗試使用可見和蒙版的塊重建整個圖像。
- 僅在蒙版塊上計算損失。
導入
- einops:用于其“repeat”函數
- architectures.vit:標準ViT變換器的架構,我使用的是在“如何訓練ViT?”中提供的。
import torch
from torch import nn
import torch.nn.functional as F
from einops import repeat

from architectures.vit import Transformer
設置MAE類:
class MAE(nn.Module):
    def __init__(
        self,
        *,
        encoder,
        decoder_dim,
        masking_ratio=0.75,
        decoder_depth=1,
        decoder_heads=8,
        decoder_dim_head=64
    ):
        super().__init__()
        # Ensure the masking ratio is valid
        assert 0 < masking_ratio < 1, 'masking ratio must be between 0 and 1'
        self.masking_ratio = masking_ratio
我們定義一個從PyTorch的nn.Module繼承的MAE類。
- 編碼器:我們的視覺變換器模型。
- decoder_dim:解碼器嵌入空間的維度(例如512)。
- masking_ratio:要蒙版的塊的比例(文章發現75%是最優的)。
- 其他解碼器配置,如深度、頭和頭維度,這些都是變換器的標準。
- 我們斷言蒙版比例在0和1之間。
塊:
        # Save the encoder (a Vision Transformer to be trained)
        self.encoder = encoder

        # Extract the number of patches and the encoder's dimensionality from the positional embeddings
        num_patches, encoder_dim = encoder.pos_embedding.shape[-2:]

        # Separate the patch embedding layers from the encoder
        # The first layer converts the image into patches
        self.to_patch = encoder.to_patch_embedding[0]
        # The remaining layers embed the patches
        self.patch_to_emb = nn.Sequential(*encoder.to_patch_embedding[1:])
發生了什么?
我們存儲編碼器并提取必要信息,如塊的數量和編碼器的輸出維度。
我們分離塊嵌入過程:
- self.to_patch:這層將圖像分割成較小的塊。
- self.patch_to_emb:這將每個塊嵌入到向量空間。
# Determine the dimensionality of the pixel values per patch
pixel_values_per_patch = encoder.to_patch_embedding[2].weight.shape[-1]
我們計算每個塊中的像素值數量,稍后會需要。
設置解碼器
self.enc_to_dec:如果編碼器和解碼器的維度不同,我們相應地映射它們。通常編碼器較大且維度較高(例如1024),而解碼器可以更淺且維度較小(例如512),但我們需要一個適配器將編碼器的維度映射到解碼器的維度。
self.mask_token:一個可學習的標記,代表解碼器的蒙版塊。當塊被蒙版時,這是解碼器看到的標記。
我們初始化解碼器變換器和其他重建所需的層。
self.decoder = Transformer(
    dim=decoder_dim,
    depth=decoder_depth,
    heads=decoder_heads,
    dim_head=decoder_dim_head,
    mlp_dim_ratio=4
)
# Positional embeddings for the decoder tokens
self.decoder_pos_emb = nn.Embedding(num_patches, decoder_dim)
# Linear layer to reconstruct pixel values from decoder outputs
self.to_pixels = nn.Linear(decoder_dim, pixel_values_per_patch)
到目前為止,你的MAE類應該像這樣初始化:
class MAE(nn.Module):
    def __init__(
        self,
        *,
        encoder,
        decoder_dim,
        masking_ratio=0.75,
        decoder_depth=1,
        decoder_heads=8,
        decoder_dim_head=64
    ):
        super().__init__()
        # Ensure the masking ratio is valid
        assert 0 < masking_ratio < 1, 'masking ratio must be between 0 and 1'
        self.masking_ratio = masking_ratio

        # Save the encoder (a Vision Transformer to be trained)
        self.encoder = encoder

        # Extract the number of patches and the encoder's dimensionality from the positional embeddings
        num_patches, encoder_dim = encoder.pos_embedding.shape[-2:]

        # Separate the patch embedding layers from the encoder
        # The first layer converts the image into patches
        self.to_patch = encoder.to_patch_embedding[0]
        # The remaining layers embed the patches
        self.patch_to_emb = nn.Sequential(*encoder.to_patch_embedding[1:])

        # Determine the dimensionality of the pixel values per patch
        pixel_values_per_patch = encoder.to_patch_embedding[2].weight.shape[-1]

        # Set up decoder parameters
        self.decoder_dim = decoder_dim
        # Map encoder dimensions to decoder dimensions if they differ
        self.enc_to_dec = (
            nn.Linear(encoder_dim, decoder_dim)
            if encoder_dim != decoder_dim
            else nn.Identity()
        )
        # Learnable mask token for masked patches
        self.mask_token = nn.Parameter(torch.randn(decoder_dim))
        # Define the decoder transformer
        self.decoder = Transformer(
            dim=decoder_dim,
            depth=decoder_depth,
            heads=decoder_heads,
            dim_head=decoder_dim_head,
            mlp_dim_ratio=4
        )
        # Positional embeddings for the decoder tokens
        self.decoder_pos_emb = nn.Embedding(num_patches, decoder_dim)
        # Linear layer to reconstruct pixel values from decoder outputs
        self.to_pixels = nn.Linear(decoder_dim, pixel_values_per_patch)
太好了!現在讓我們看看如何在前向傳遞中使用這些不同的部分,這有點像拼圖。
前向傳遞
讓我們走過前向函數,它定義了我們的模型如何處理輸入數據。
def forward(self, img):
    device = img.device

    # Convert the input image into patches
    patches = self.to_patch(img)  # Shape: (batch_size, num_patches, patch_size)
    batch_size, num_patches, *_ = patches.shape

    # Embed the patches using the encoder's patch embedding layers
    tokens = self.patch_to_emb(patches)  # Shape: (batch_size, num_patches, encoder_dim)
開始非常標準,我們只需要將“將圖像塊化”操作與“投影到標記”操作分解,因為我們使用原始塊作為計算損失的基準。
- 前向方法以圖像張量img作為輸入。
- 我們獲取張量所在的設備(CPU或GPU)。
- 我們將圖像分割成塊。
- 我們獲得批量大小和塊的數量。
- 每個塊被嵌入到一個向量中。
位置編碼:
# Add positional embeddings to the tokens
if self.encoder.pool == "cls":
    # If using CLS token, skip the first positional embedding
    tokens += self.encoder.pos_embedding[:, 1 : num_patches + 1]
elif self.encoder.pool == "mean":
    # If using mean pooling, use all positional embeddings
    tokens += self.encoder.pos_embedding.to(device, dtype=tokens.dtype)
我們為每個標記添加位置信息,以便模型知道每個塊來自哪里。如果有額外的CLS標記,我們需要跳過它,因為它不是圖像的一部分。
蒙版和編碼
現在我們來到最有趣的部分,蒙版圖像。
# Determine the number of patches to mask
num_masked = int(self.masking_ratio * num_patches)

# Generate random indices for masking
rand_indices = torch.rand(batch_size, num_patches, device=device).argsort(dim=-1)
masked_indices = rand_indices[:, :num_masked]
unmasked_indices = rand_indices[:, num_masked:]
我們根據我們的蒙版比例計算我們將蒙版多少塊。
我們為每個塊序列生成一個隨機排列。
我們相應地定義masked_indices和unmasked_indices。
# Select the tokens corresponding to unmasked patches
batch_range = torch.arange(batch_size, device=device)[:, None]
tokens = tokens[batch_range, unmasked_indices]

# Select the original patches that are masked (for reconstruction loss)
masked_patches = patches[batch_range, masked_indices]

# Encode the unmasked tokens using the encoder's transformer
encoded_tokens = self.encoder.transformer(tokens)
我們選擇剛剛定義的masked_indices對應的masked_patches。
我們只保留未蒙版塊的標記以進行編碼。
解碼
現在讓我們進入最令人興奮但也最難的部分,解碼!
# Map encoded tokens to decoder dimensions if necessary
decoder_tokens = self.enc_to_dec(encoded_tokens)

# Add positional embeddings to the decoder tokens of unmasked patches
unmasked_decoder_tokens = decoder_tokens + self.decoder_pos_emb(unmasked_indices)

# Create mask tokens for the masked patches and add positional embeddings
mask_tokens = repeat(self.mask_token, 'd -> b n d', b=batch_size, n=num_masked)
mask_tokens = mask_tokens + self.decoder_pos_emb(masked_indices)

# Initialize the full sequence of decoder tokens
decoder_sequence = torch.zeros(
  batch_size, num_patches, self.decoder_dim, device=device
)
# Place unmasked decoder tokens and mask tokens in their original positions
decoder_sequence[batch_range, unmasked_indices] = unmasked_decoder_tokens
decoder_sequence[batch_range, masked_indices] = mask_tokens

# Decode the full sequence
decoded_tokens = self.decoder(decoder_sequence)

# Extract the decoded tokens corresponding to the masked patches
masked_decoded_tokens = decoded_tokens[batch_range, masked_indices]- 我們調整編碼標記以匹配解碼器預期的輸入大小self.enc_to_dec
- 我們向解碼器標記添加位置嵌入。
- 對于蒙版位置,我們使用蒙版標記并添加位置嵌入。
- 我們通過將未蒙版和蒙版標記放回其原始位置來重建完整序列。
- 我們將完整序列傳遞給解碼器。
- 我們提取對應于蒙版塊的解碼標記。
# Reconstruct the pixel values from the masked decoded tokens
pred_pixel_values = self.to_pixels(masked_decoded_tokens)

# Compute the reconstruction loss (mean squared error)
recon_loss = F.mse_loss(pred_pixel_values, masked_patches)
return recon_loss- 我們嘗試重建蒙版塊的原始像素值。
- 我們通過將重建的塊與原始蒙版塊進行比較來計算L2損失。
參考資料:
- 參考代碼:https://github.com/FrancoisPorcher/awesome-ai-tutorials?source=post_page-----6f454b736087--------------------------------
- 論文:https://arxiv.org/abs/2111.06377
- 參考代碼:https://github.com/lucidrains/vit-pytorch
責任編輯:趙寧寧
來源:
小白玩轉Python