Gemini 可以進行目標檢測了!
我們對Gemini印象深刻的多模態能力已經很熟悉了,特別是在涉及圖像數據推理時——無論是涉及圖像描述、OCR、分類,還是識別圖像中的特定內容。與其開放模型對應物PaliGemma不同,Gemini模型并沒有明確針對目標檢測任務進行訓練。這一事實促使我進行一些實驗并撰寫這篇博客。
PaliGemma鏈接:https://ai.google.dev/gemma/docs/paligemma
注意:在這里,當我們談論目標檢測時,我們指的是通過繪制邊界框來識別和定位對象,就像YOLO、DETR、EfficientDet、Florence-2和PaliGemma等模型所做的那樣。

先決條件
我們只需要Gemini的API密鑰——別無他物。我假設你已經熟悉Gemini API。如果你不熟悉,請查看這篇博客,了解如何在Google AI Studio上創建你的Gemini API密鑰。打開倉庫中的Colab筆記本:https://github.com/NSTiwari/Object-Detection-using-Gemini
步驟1:安裝必要的庫和依賴項
# Install Generative AI SDK.
!pip install -q -U google-generativeai

# Import libraries
from google.colab import userdata
import google.generativeai as genai
import re
from PIL import Image
import cv2
import numpy as np
步驟2:配置API密鑰和模型
你可以選擇Gemini 1.5 Flash或Gemini 1.5 Pro,隨你喜歡。
API_KEY = userdata.get('gemini')
genai.configure(api_key=API_KEY)

model = genai.GenerativeModel(model_name='gemini-1.5-pro')
步驟3:傳遞輸入圖像和文本提示
使文本提示清晰簡單,使用示例。在這種情況下,我們要求Gemini提供如下格式的邊界框坐標:[ymin, xmin, ymax, xmax, object_name]。
input_image = "image.jpg" # @param {type : 'string'}
img = Image.open(input_image)

response = model.generate_content([
    img,
    (
        "Return bounding boxes for all objects in the image in the following format as"
        " a list. \n [ymin, xmin, ymax, xmax, object_name]. If there are more than one object, return separate lists for each object"
    ),
])

result = response.text
步驟4:解析模型響應
def parse_bounding_box(response):
    bounding_boxes = re.findall(r'\[(\d+,\s*\d+,\s*\d+,\s*\d+,\s*[\w\s]+)\]', response)

    # Convert each group into a list of integers and labels.
    parsed_boxes = []
    for box in bounding_boxes:
        parts = box.split(',')
        numbers = list(map(int, parts[:-1]))
        label = parts[-1].strip()
        parsed_boxes.append((numbers, label))

    # Return the list of bounding boxes with their labels.
    return parsed_boxes

bounding_box = parse_bounding_box(result)
步驟5:繪制邊界框
模型提供的邊界框坐標必須通過將圖像的高和寬除以1000來歸一化。
label_colors = {}

def draw_bounding_boxes(image, bounding_boxes_with_labels):
    if image.mode != 'RGB':
        image = image.convert('RGB')

    image = np.array(image)

    for bounding_box, label in bounding_boxes_with_labels:

        # Normalize the bounding box coordinates.
        width, height = image.shape[1], image.shape[0]
        ymin, xmin, ymax, xmax = bounding_box
        x1 = int(xmin / 1000 * width)
        y1 = int(ymin / 1000 * height)
        x2 = int(xmax / 1000 * width)
        y2 = int(ymax / 1000 * height)

        if label not in label_colors:
            color = np.random.randint(0, 256, (3,)).tolist()
            label_colors[label] = color
        else:
            color = label_colors[label]

        font = cv2.FONT_HERSHEY_SIMPLEX
        font_scale = 0.5
        font_thickness = 1
        box_thickness = 2
        text_size = cv2.getTextSize(label, font, font_scale, font_thickness)[0]

        text_bg_x1 = x1
        text_bg_y1 = y1 - text_size[1] - 5
        text_bg_x2 = x1 + text_size[0] + 8
        text_bg_y2 = y1


        cv2.rectangle(image, (text_bg_x1, text_bg_y1), (text_bg_x2, text_bg_y2), color, -1)
        cv2.putText(image, label, (x1 + 2, y1 - 5), font, font_scale, (255, 255, 255), font_thickness)
        cv2.rectangle(image, (x1, y1), (x2, y2), color, box_thickness)

    image = Image.fromarray(image)
    return image

output = draw_bounding_boxes(img, bounding_box)
讓我們從一個簡單的例子開始:
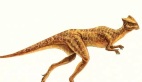
目標:單個對象的圖像
提示:以列表格式返回圖像中人物的邊界框。[ymin, xmin, ymax, xmax, object_name]。

好的開始,現在讓我們嘗試多個對象。
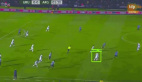
目標:多個對象的圖像
提示:以列表格式返回圖像中所有對象的邊界框。[ymin, xmin, ymax, xmax, object_name]。如果有一個以上的對象,請為每個對象返回單獨的列表。

狗和自行車
一點也不差。它準確地檢測到了對象,但這些都是常見的對象,對吧?讓我們進一步挑戰Gemini。我有一張著名的畫作“Ram Darbar”的圖片,來自《羅摩衍那》。讓我們看看Gemini是否能識別和檢測畫中的所有角色。
提示:這是《羅摩衍那》中“Ram Darbar”的一幅畫。以列表格式返回圖像中所有角色的邊界框。[ymin, xmin, ymax, xmax, character_name]。

《羅摩衍那》中的Ram Darbar畫作
我印象深刻的是,它不僅繪制了邊界框,還準確地識別了每個角色,尤其是當我特別要求他們的名字時。是時候測試一些非傳統圖像了。我畫了阿爾伯特·愛因斯坦(抱歉,這是我能做的最好的了)。讓我們試一試。
目標:一幅繪畫的圖片
提示:以列表格式返回圖像中著名人物的名稱和邊界框。[ymin, xmin, ymax, xmax, object_name]。

作者畫的阿爾伯特·愛因斯坦
在對不同圖像進行一系列測試后:從識別人和物體到識別繪畫和繪畫中的人物,并準確地用邊界框定位它們,Gemini確實滿足了我對目標檢測的期望。我個人不會將Gemini與專門設計用于目標檢測的模型進行比較,因為它的優勢在于不同的領域。然而,這個實驗滿足了我的好奇心:它能夠很好地處理檢測任務,并且能夠檢測幾乎所有的物體。